
Setup PingOne for Enterprise as an Identity Provider for AWS
In this tutorial, we will be exploring the configuration steps involving the setup of PingOne for Enterprise as an Identity Provider for AWS. But before we jump into the technical aspect of the configuration involved, lets look into why we would implement a solution where you have a dedicated Identity Provider (IDP) responsible for authenticating users and an Service Provider who trusts the IDP, hence allowing users authenticated using IDP to leverage the service provided by Service Provider. This flow is also known as IDP initiated workflow.
What is SAML? What does it mean by IDP and SP?
Simply saying, Identity Providers (IDP) refers to the system that holds the identity of users and authenticates them when logging in and Service Provider (SP) refers to a system that is providing a service based on the authentication parameters sent by the IDP (when the user authenticates to IDP), meaning it will authorize the user and allow/reject access to services based on what the user is allowed to do.
Security Assertion Markup Language or SAML as we know it is an open standard that enables identity federation by allowing Identity Providers (IDP) to securely pass authenticated identities including their attributes to a Service Provider (SP) so that the user logging in can use Single Sign On (SSO) to login to the service(s) provided by the SP. This allows user management at scale as a user will login once to their IDP and once authenticated, will be allowed to use the same credentials to login to multiple other websites or applications.
The standard file format for SAML transactions is XML (Extensible Markup Language). The IDP and SP agree to a set of logins, users, attributes and other required information and they pass the information to one another using XML assertion. This enablement of Single Sign On (SSO) where users can login to their IDP once and use the same set of credentials to login to multiple other services is provided via SAML.
Lets think about the steps that occur when using an IDP initiated SAML workflow,
- User logs into IDP using their credentials, lets say PingOne for Enterprise.
- PingOne authenticates the user.
- User logs into a different application from the IDP console, lets say Facebook.
- PingOne sends the user attributes to Facebook and since Facebook has a trust relationship with PingOne, it will check for required attributes in the SAML assertion and authorize the user to use Facebook.
- Facebook will then redirect the user to the HomePage.
- Similarly, the user can login to multiple applications or services using the same set of login credentials as authenticated by PingOne.
Some benefits of using SAML,
- Seamless logins - Users only need to login once to their IDP using their credentials. Once authenticated, the users can use the same credentials to login to multiple sites. This allows for faster logins and improved user experience.
- Decoupling Identities - All the user related information is stored by IDP and only passed to the SP as deemed necessary. Only credentials and attributes as required by the SP are forwarded by the IDP.
- Cost savings for SP - Since an IDP is responsible for management of users and their information, this removes burden from an SP.
- Improved security - An IDP is a single point of authentication for all users. This pattern ensures that only required information is provided to an SP for authorization.
I hope that above helps understand the basics of SAML and the terms IDP and SP. We will now look at the technical implementation of SAML where we will be configuring PingOne for Enterprise as an Identity Provider (IDP) and Amazon Web Services (AWS) as a service provider. This is a widely used pattern for cloud services which enables users to use existing corporate credentials to login to external services like AWS to perform specific tasks.
Prerequisites
- A free tier AWS Account.
- PingOne for Enterprise Account
Configure PingOne as an Identity Provider for AWS
Configuring PingOne as an Identity Provider involves setting up an identity repository (we will leverage PingOne Directory), creating a group for our users, inviting users and adding them to the individual groups. Lastly, we need to create an application for AWS with the identity repository group attached to it.
- Navigate to https://admin.pingone.com/ and login using your admin credentials.
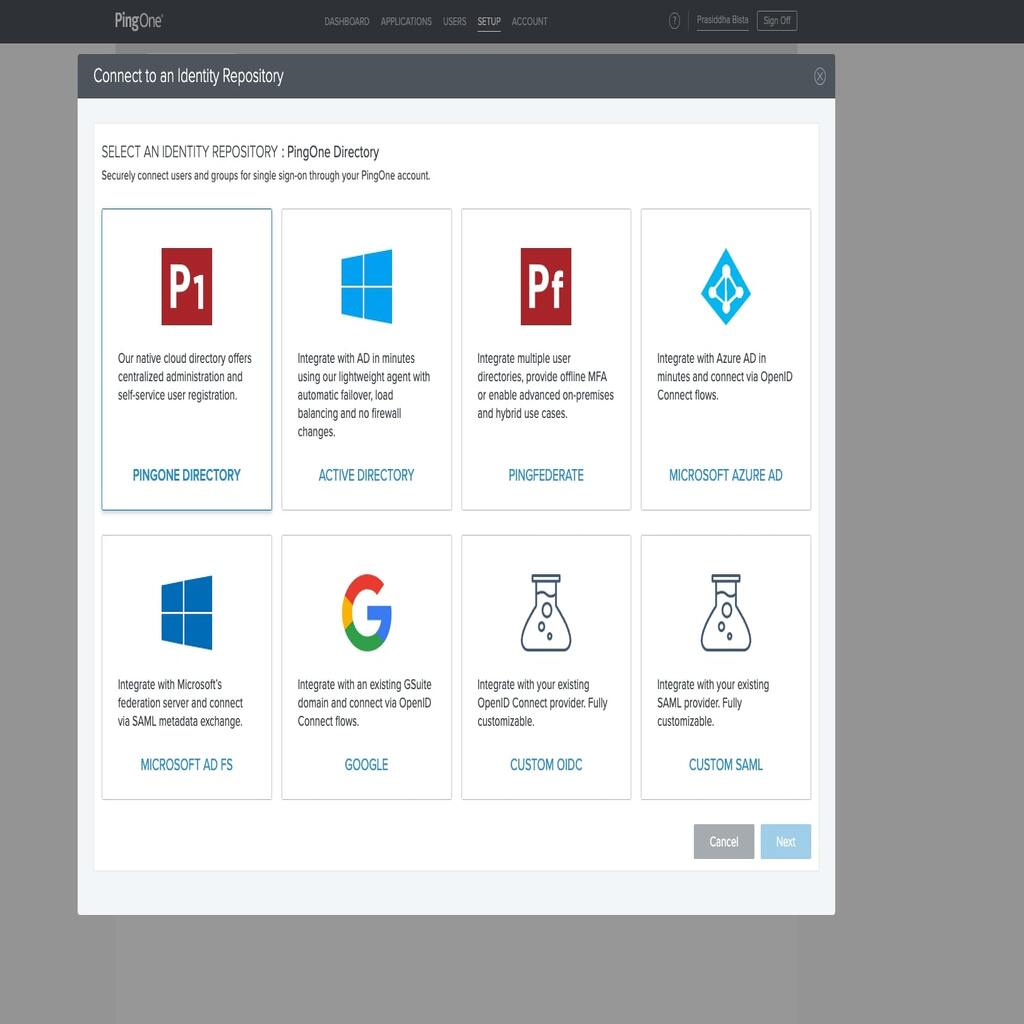
- Navigate to SETUP from the top menu of the dashboard. Then click on Connect to an Identity Repository and select PINGONE DIRECTORY.
-
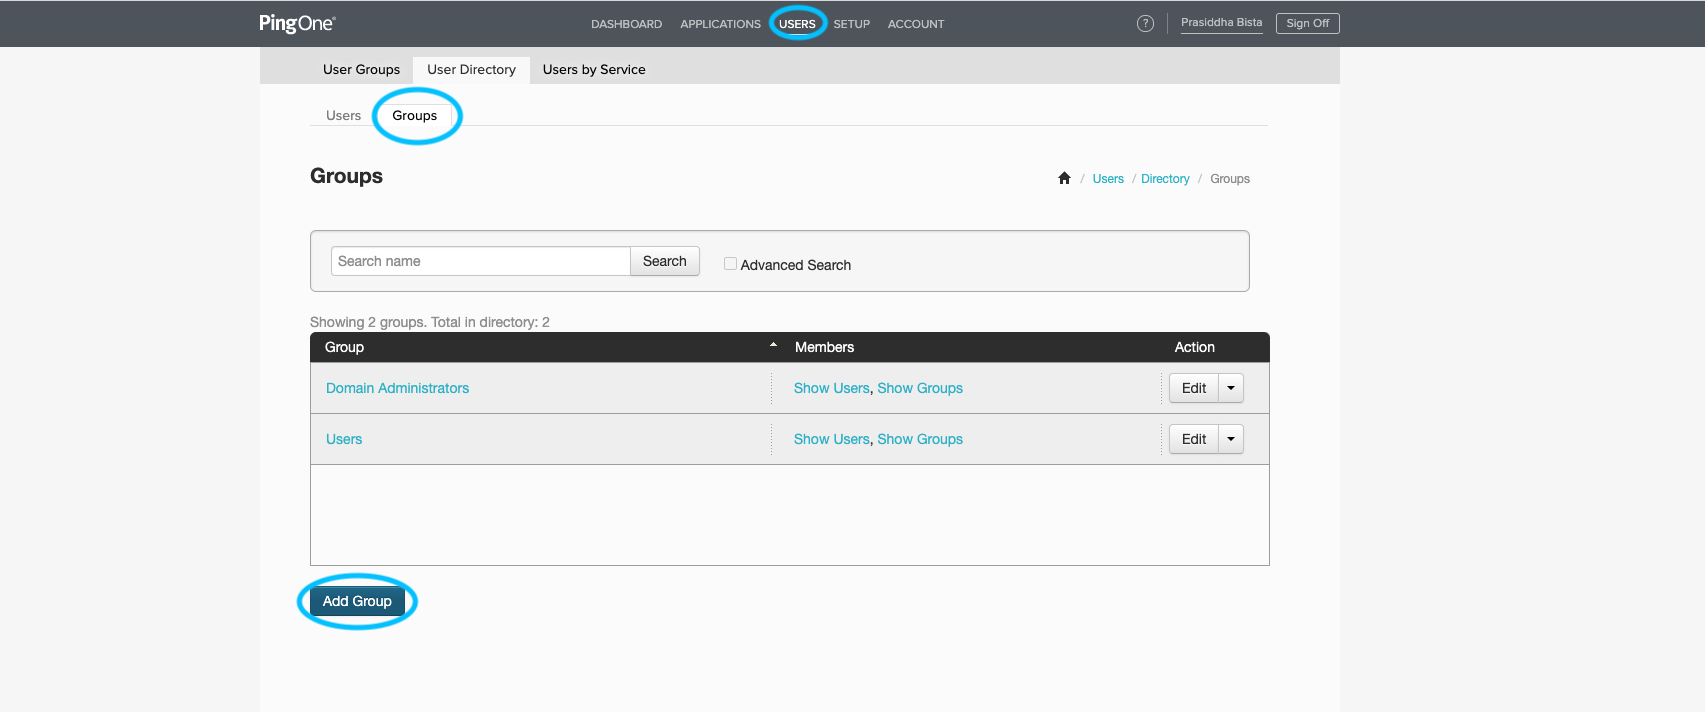
Navigate to USERS, then click on Groups and Add Group.
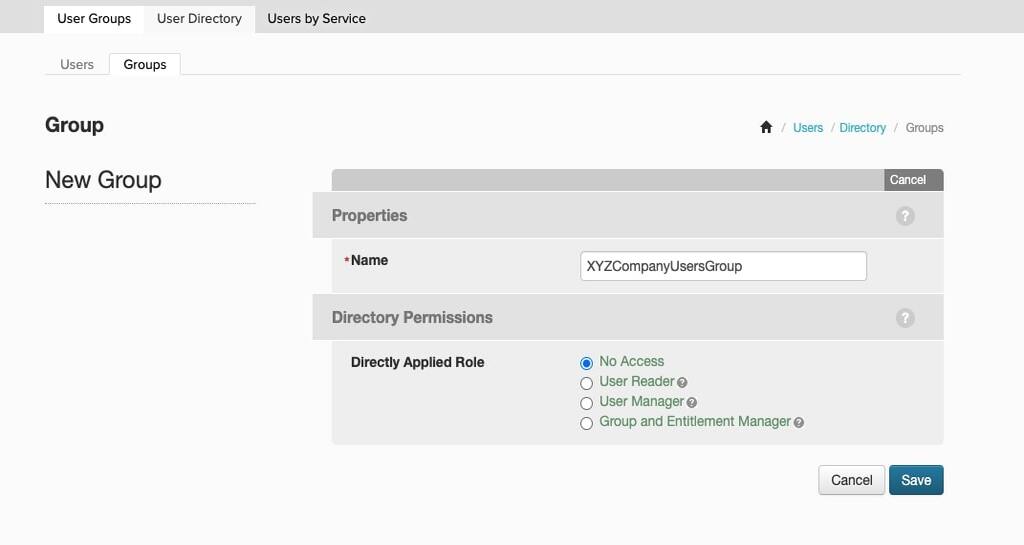
- Add a group name and for the Directory Applied Role, leave it at its default with No Access. This prevents the users in PingOne from accessing any data related to the user or group information. Click on Save.
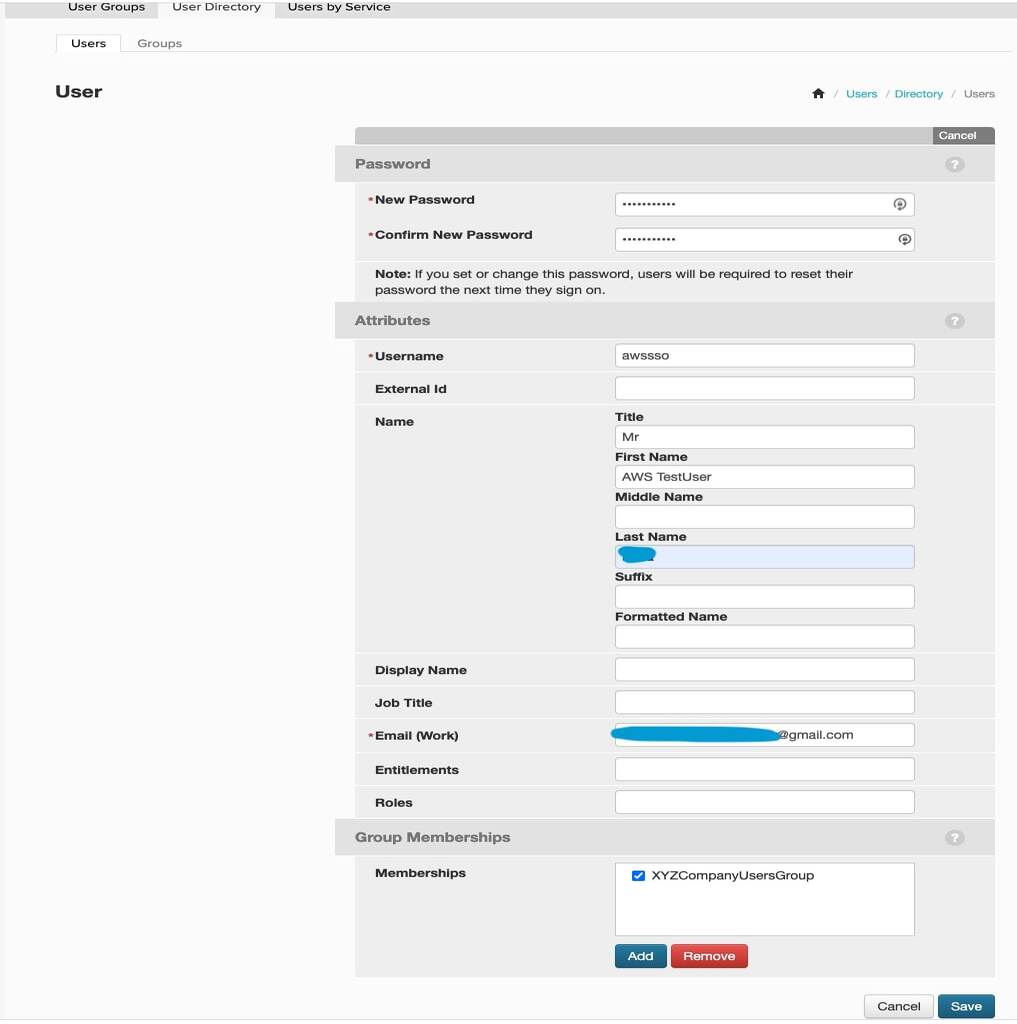
- Navigate to Users and click on Add Users. Then click on Create New User. Fill in the user details and add the user to the group previously created. Then click Save to create the new user. PingOne will send an invitation to the user’s email address which will help finish the setup from the user’s perspective. The user will be required to change their password upon logging in. If you create users via the API, you are not required to set a password while inviting a user to join PingOne.
-
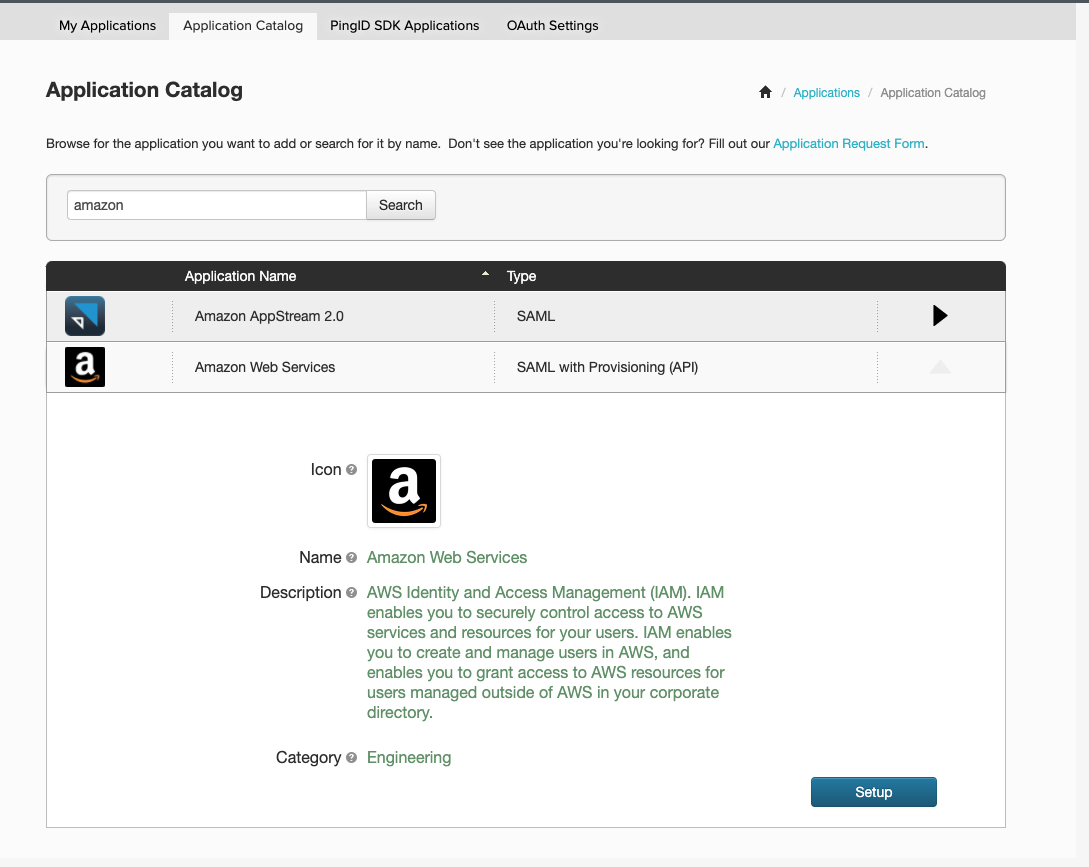
Navigate to Application Catalog and search for amazon, select the AWS Single Sign-On application and click on Setup.
-
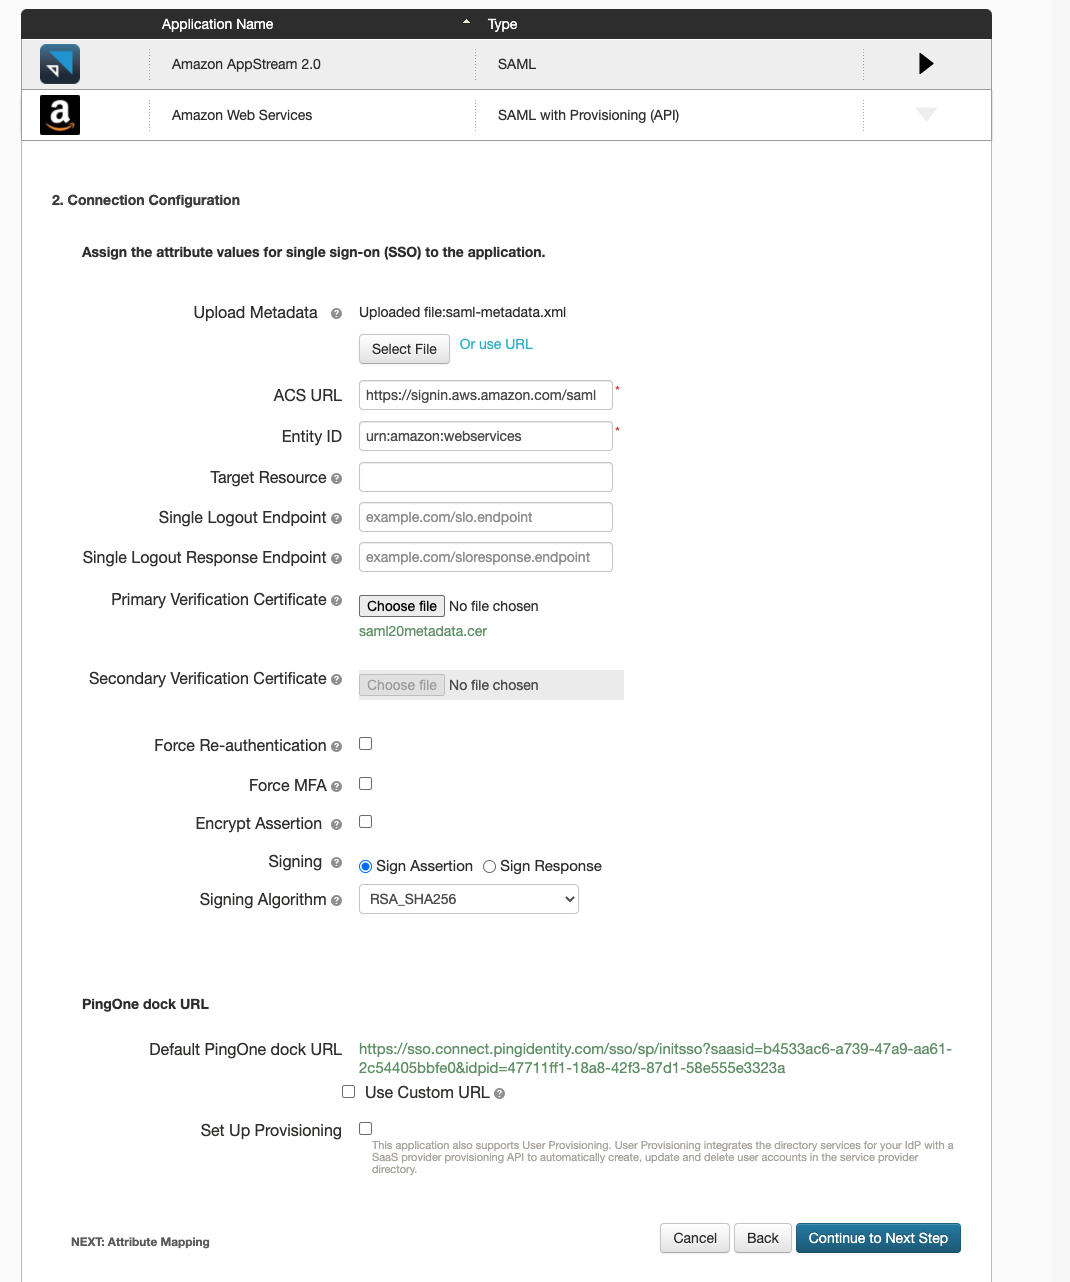
Click on Continue to Next Step for the first page of configuration and when you get to the second Connection Configuration page, upload generic metadata file under Upload Metadata which you can find under the URL https://signin.aws.amazon.com/static/saml-metadata.xml. Once uploaded, PingOne will automatically populate some fields like ACS URL and Entity ID. Leave the rest to its default and click on Continue to Next Step.
-
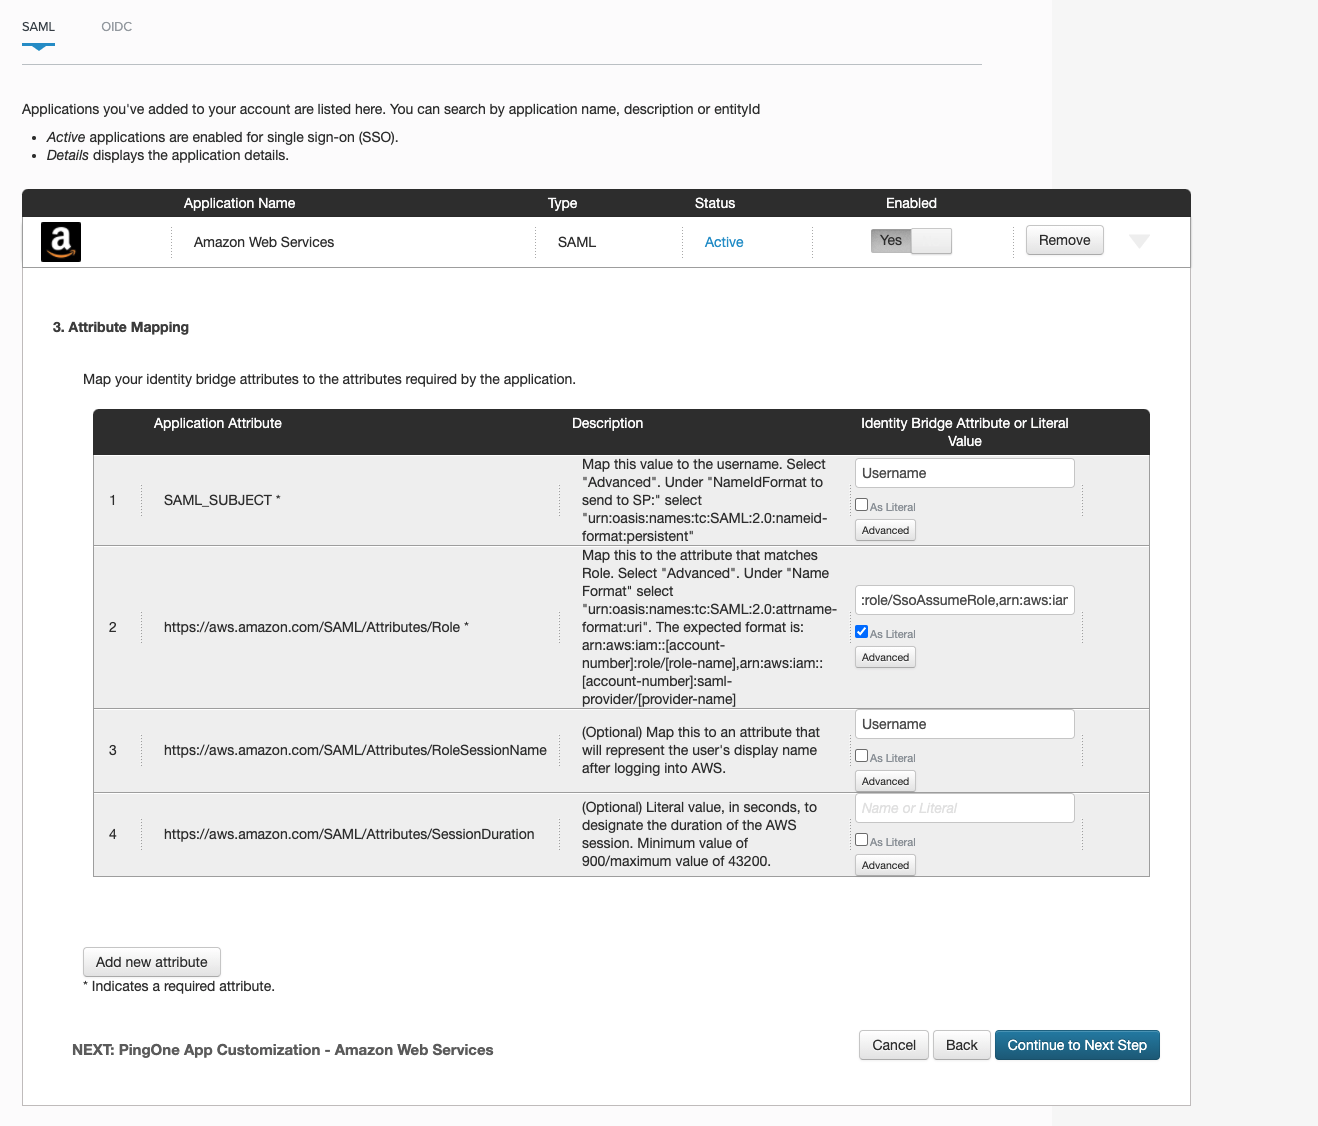
In the Attribute Mapping section,
- For SAML_SUBJECT, select Advanced. Select urn:oasis:names:tc:SAML:2.0:nameid-format:persistent for NameIdFormat to send to SP and choose userName for IDP Attribute Name.
- For the application attribute https://aws.amazon.com/SAML/Attributes/Role, select Advanced and select urn:oasis:names:tc:SAML:2.0:attrname-format:uri for Name Format. Under IDP Attribute Name, we will format the role and provider arns (yet to be created on AWS side) in the format arn:aws:iam::AWS_ACCOUNT_ID:role/IAM_ROLE_NAME,arn:aws:iam:: ::AWS_ACCOUNT_ID:saml-provider/SAML_PROVIDER_NAME. Also select the checkbox for As Literal option. Remember the Role name and SAML provider name as we will be using the exact names to create an IAM Role and an IAM Provider on AWS side.
-
For the application attribute https://aws.amazon.com/SAML/Attributes/RoleSessionName, choose username. Finally, click on Continue to Next Step until you reach step 5.
- For step 5 - Group Access, we will add previously created PingOne Directory Group to this application.
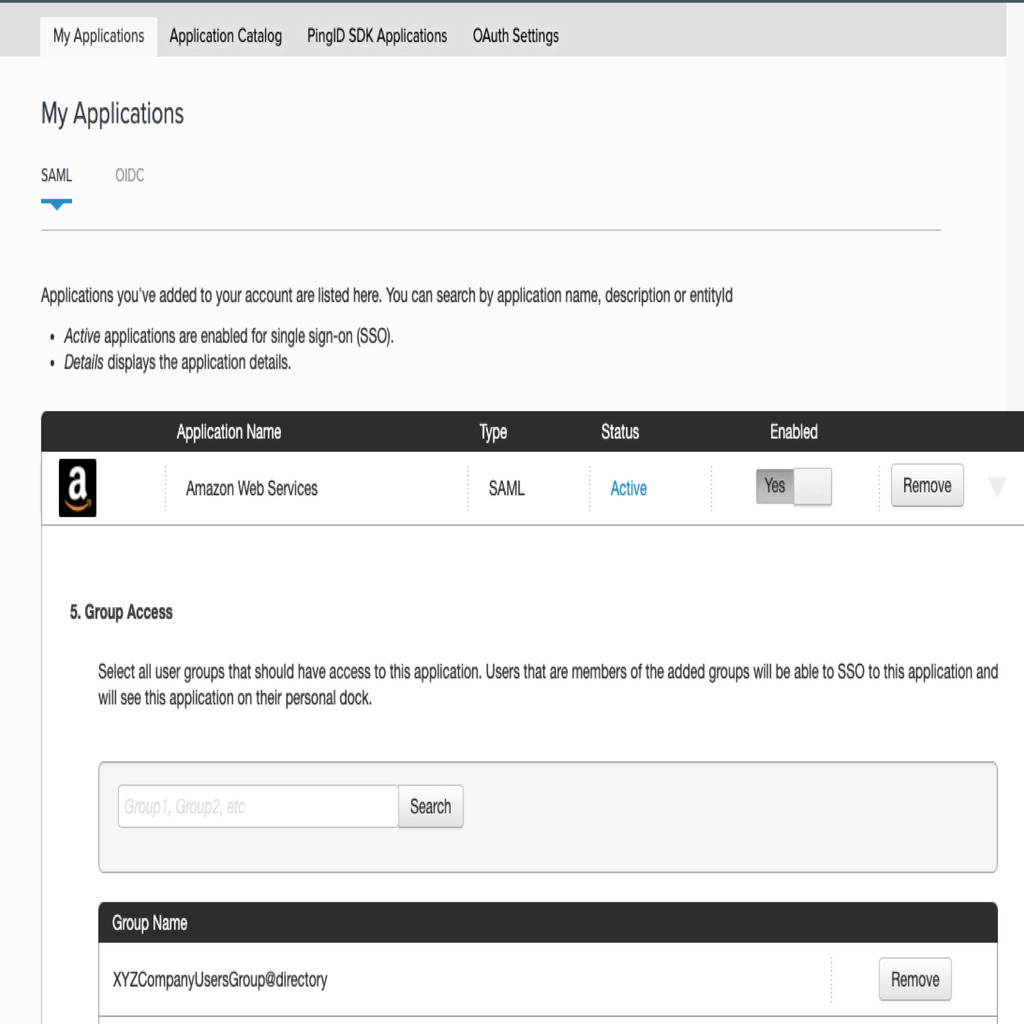
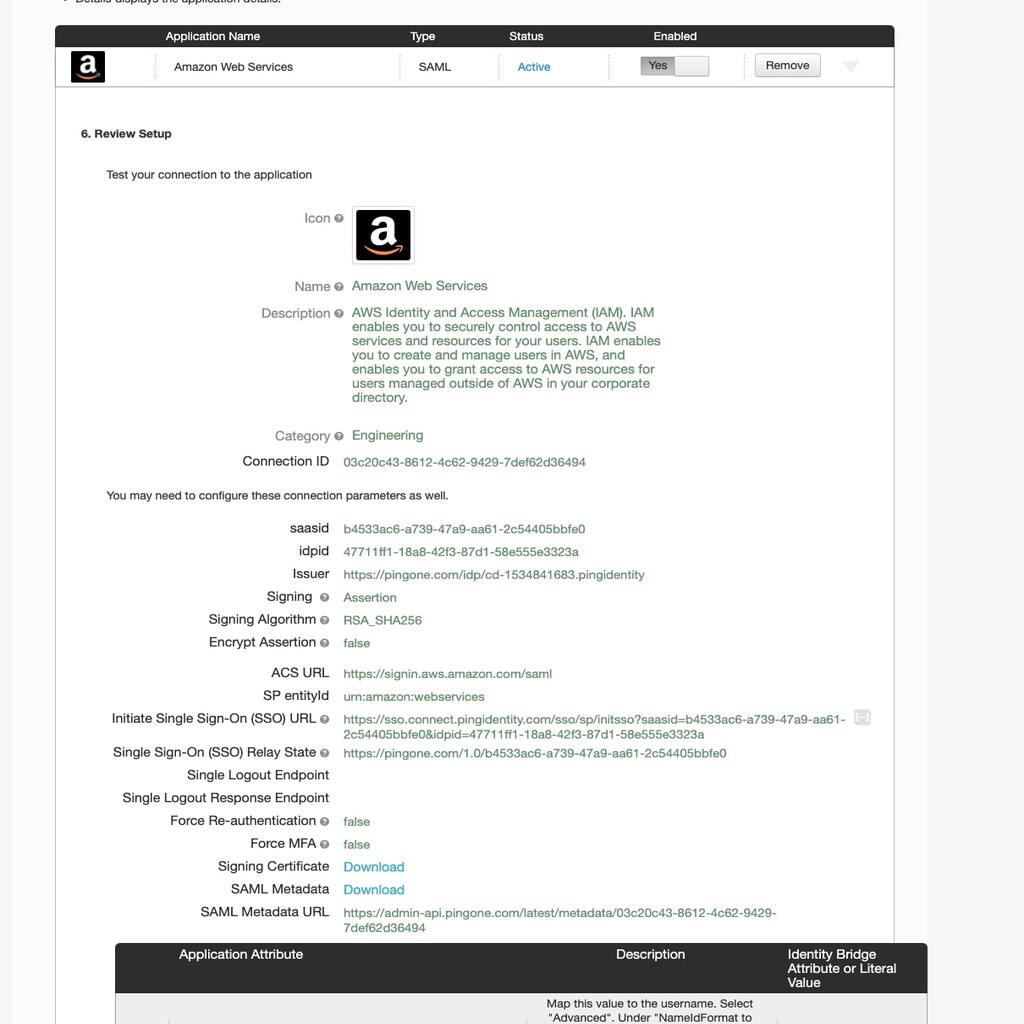
- Then we will review our setup configuration on the final screen. Download the SAML Metadata from the review screen which we will upload to AWS when creating the IAM Provider. After you have done reviewing, click on Finish.
-
Click on Continue to Next Step for the first page of configuration and when you get to the second Connection Configuration page, upload generic metadata file under Upload Metadata which you can find under the URL https://signin.aws.amazon.com/static/saml-metadata.xml. Once uploaded, PingOne will automatically populate some fields like ACS URL and Entity ID. Leave the rest to its default and click on Continue to Next Step.
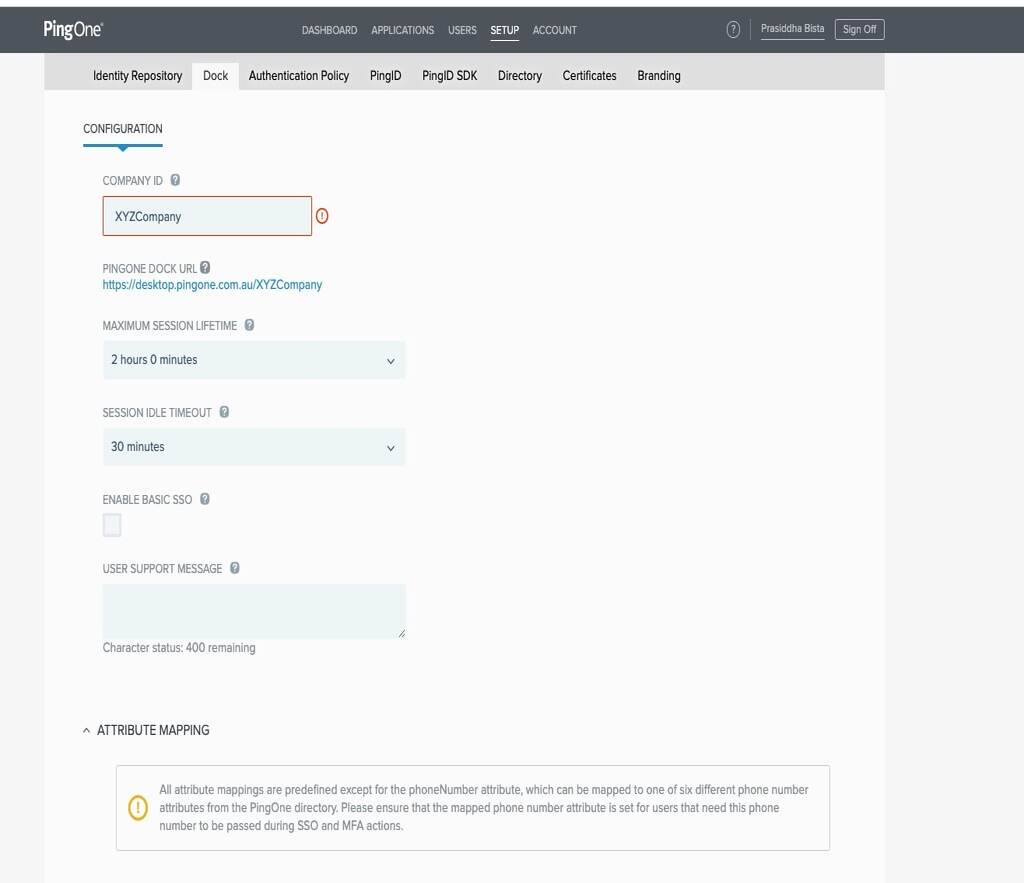
- We can now setup PingOne Dock, which allows users to select any applications they are allowed to SSO into. Navigate to SETUP and click on Dock. For Company ID, choose your company name which will form the PingOne Dock URL for your users to login to. Remember the PingOne Dock URL as we will be using it to login to PingOne Dock which will allow us to SSO into AWS. Click on Save.
Configure AWS to create a trust with the Identity Provider.
We need to create an IAM Identity provider and an IAM Role for SAML federated access on AWS side. A user will first authenticate against PingOne and receive a SAML assertion which the user will then present to AWS with an AssumeRoleWithSAML API call. AWS will then validate the SAML assertion and allow the user to use Single Sign On (SSO) to login to AWS. So without further due, let’s get on to create an Identity Provider for PingOne from AWS IAM Console and then we will create an IAM role for the authenticated users to assume.
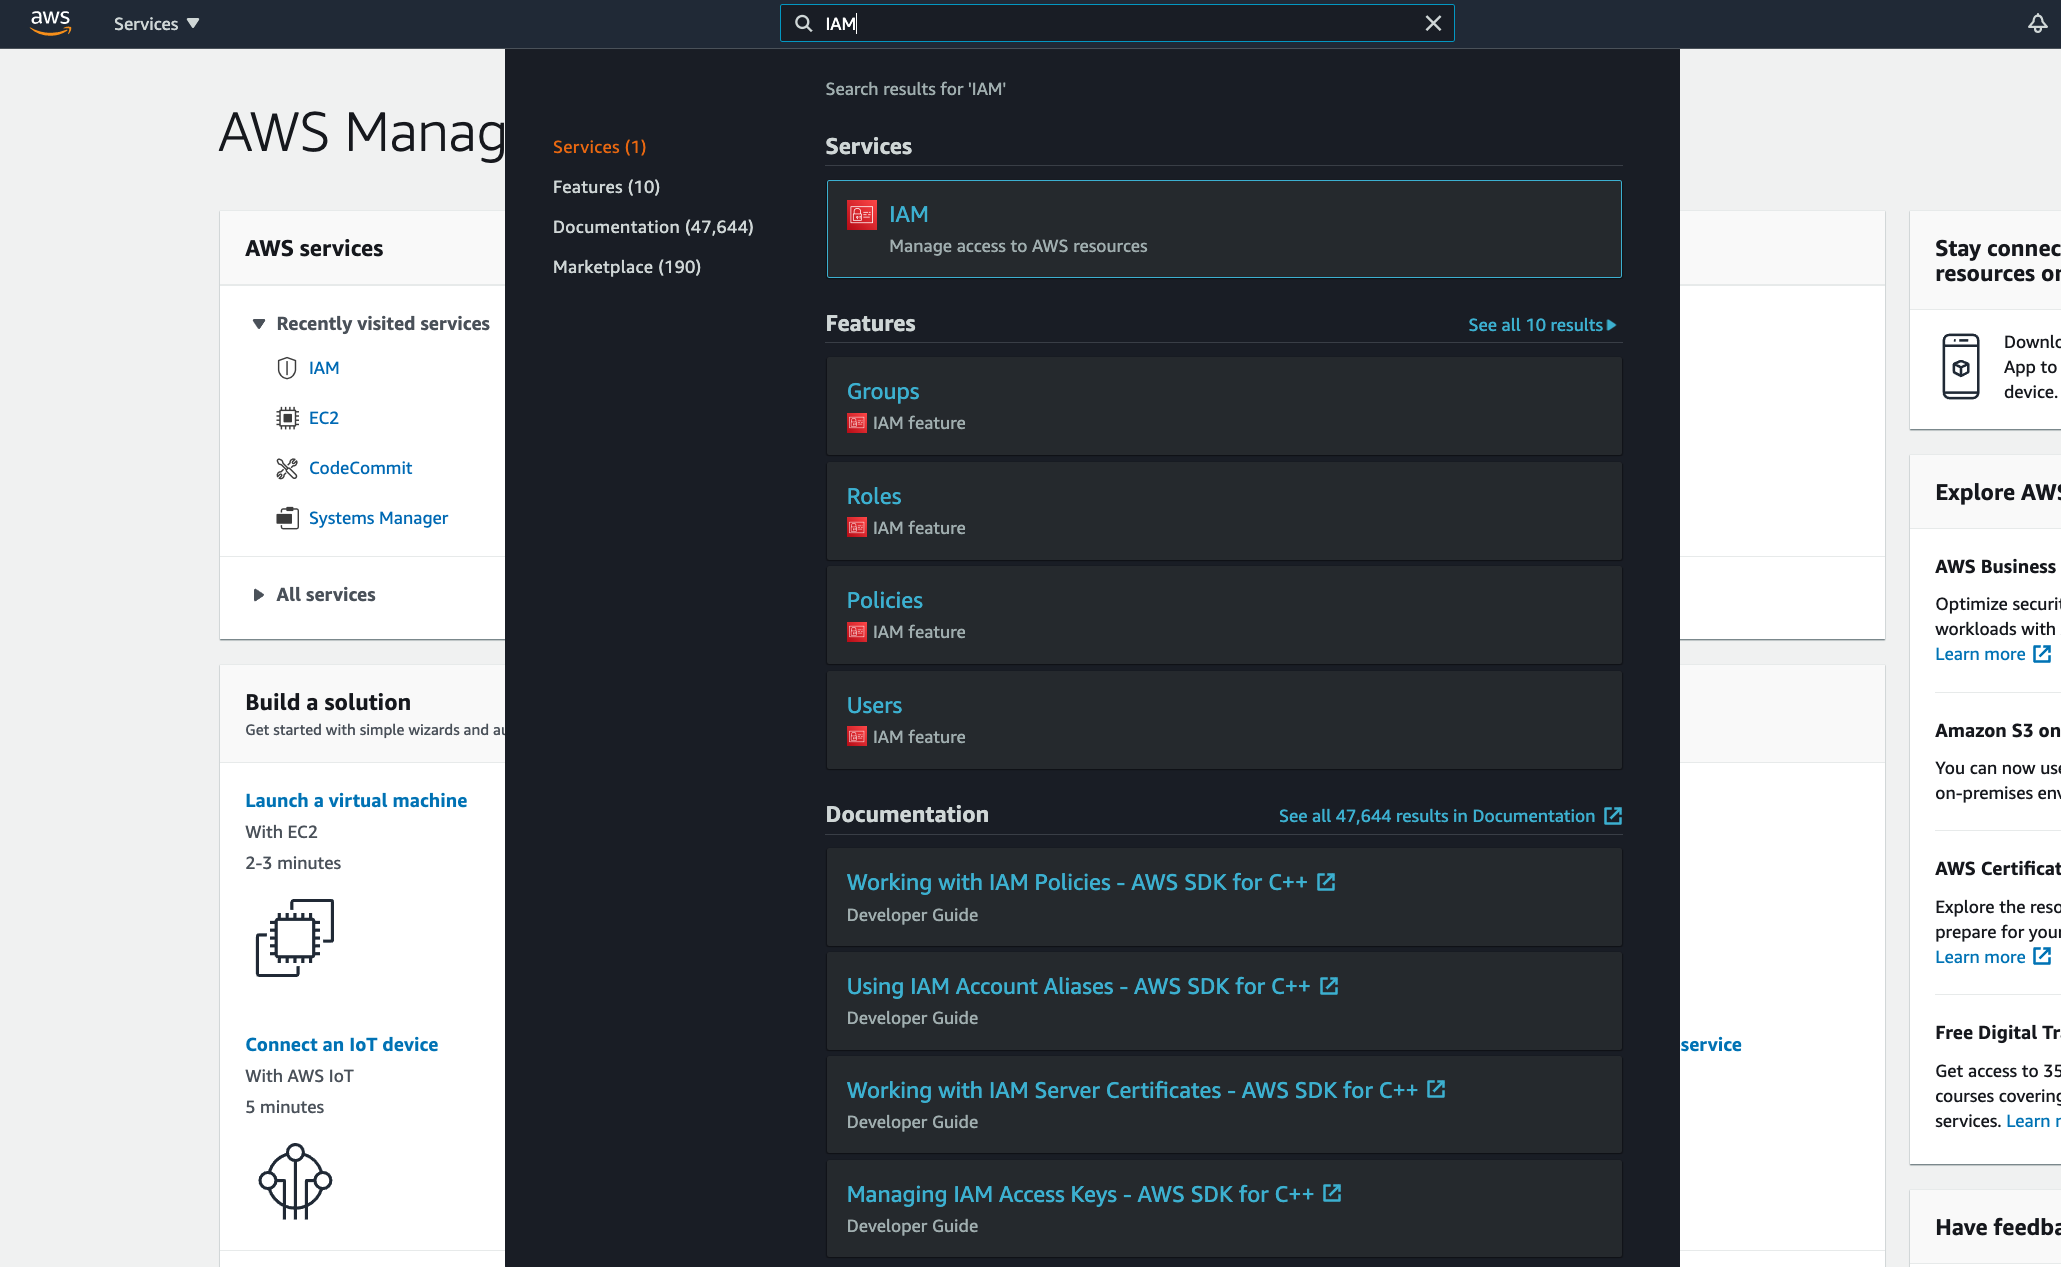
- Login to the AWS Console of your master account and navigate to the IAM service.
-
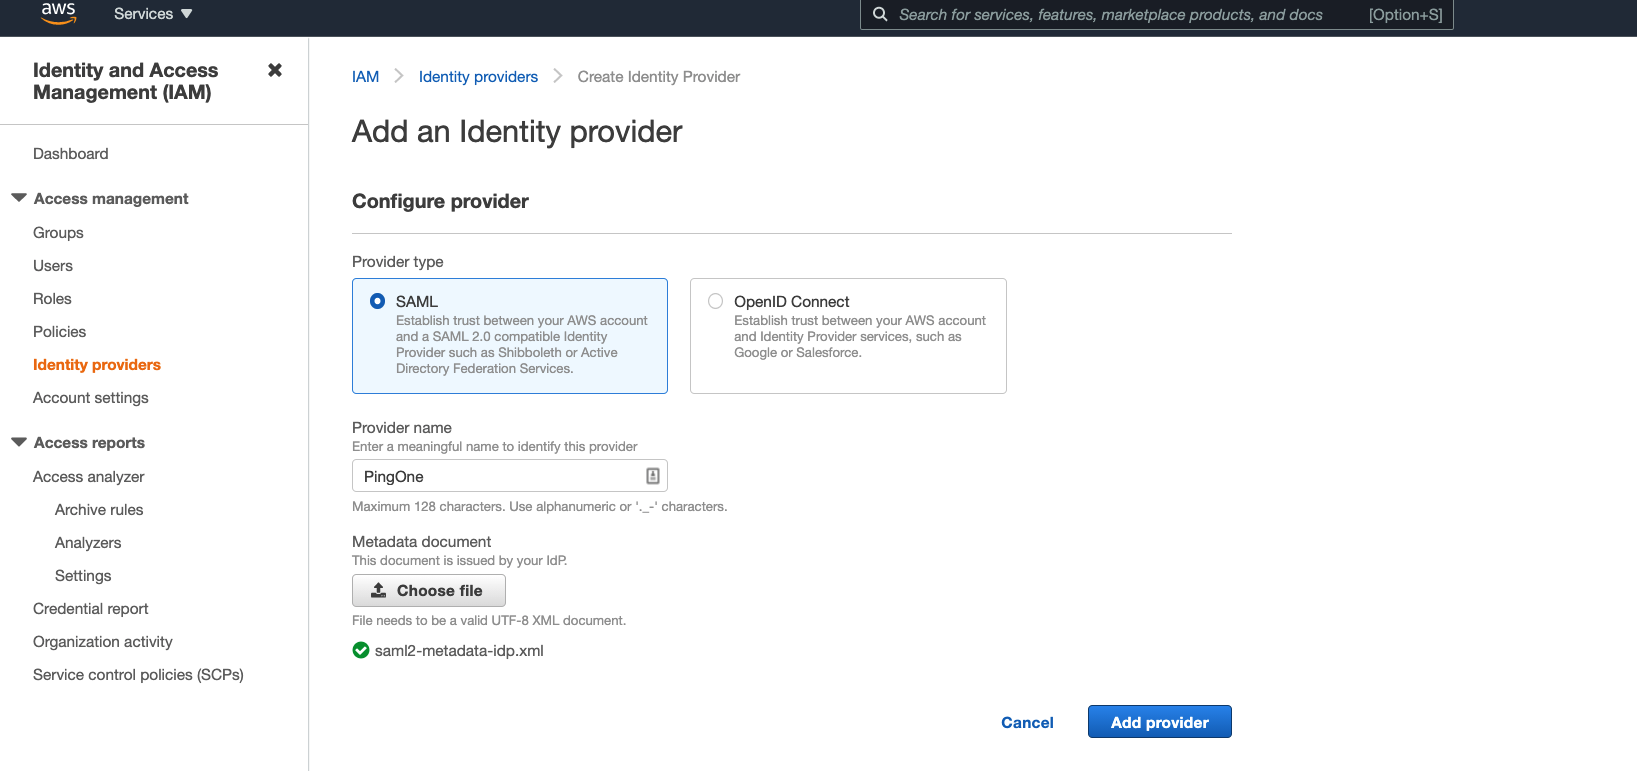
Click on Identity providers and then Add provider.

- For the provider type, choose SAML.
- Choose a provider name, like PingOne.
- Upload the SAML metadata downloaded earlier from PingOne.
- Click on Add provider.

-
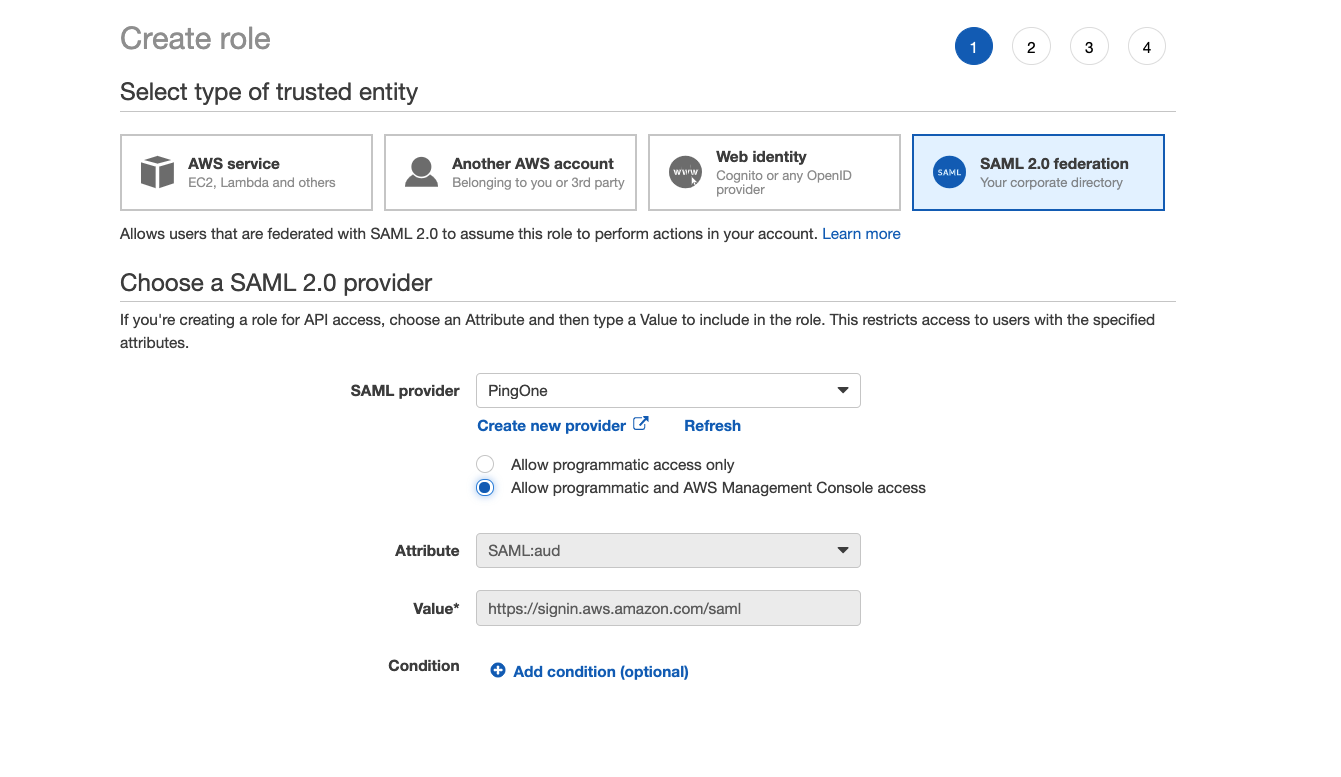
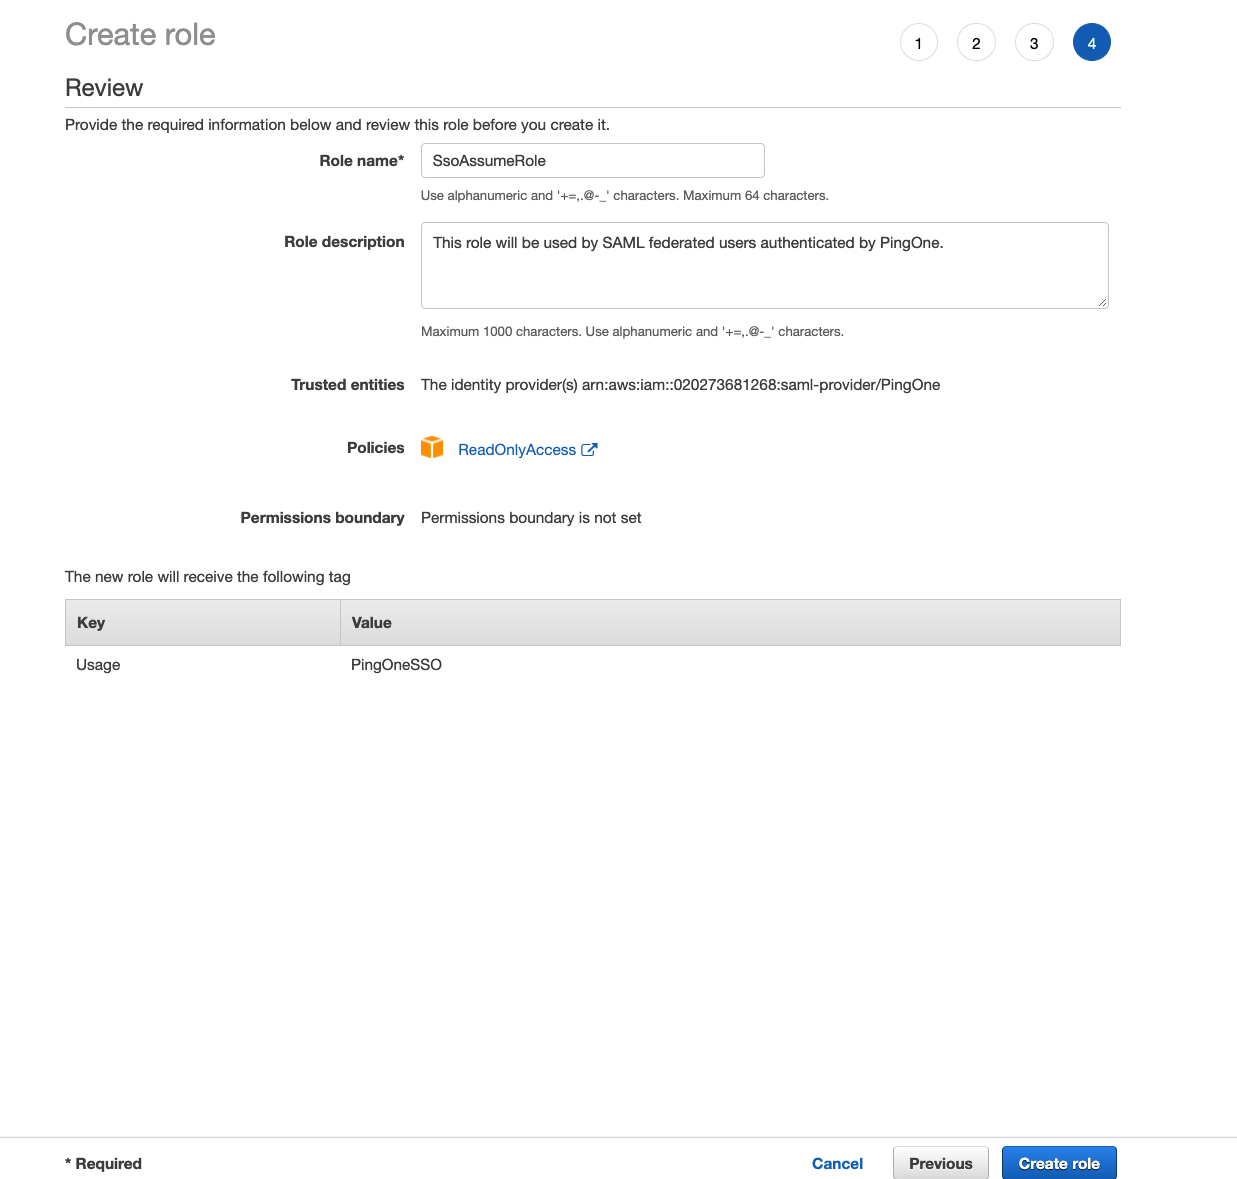
Click on Roles and then Create role button.

- For trusted identity choose SAML 2.0 federation. Then from the SAML Provider drop down menu, select the IAM Provider created previously. Select Allow programmatic and AWS Management Console access and then click on Next:Permissions.
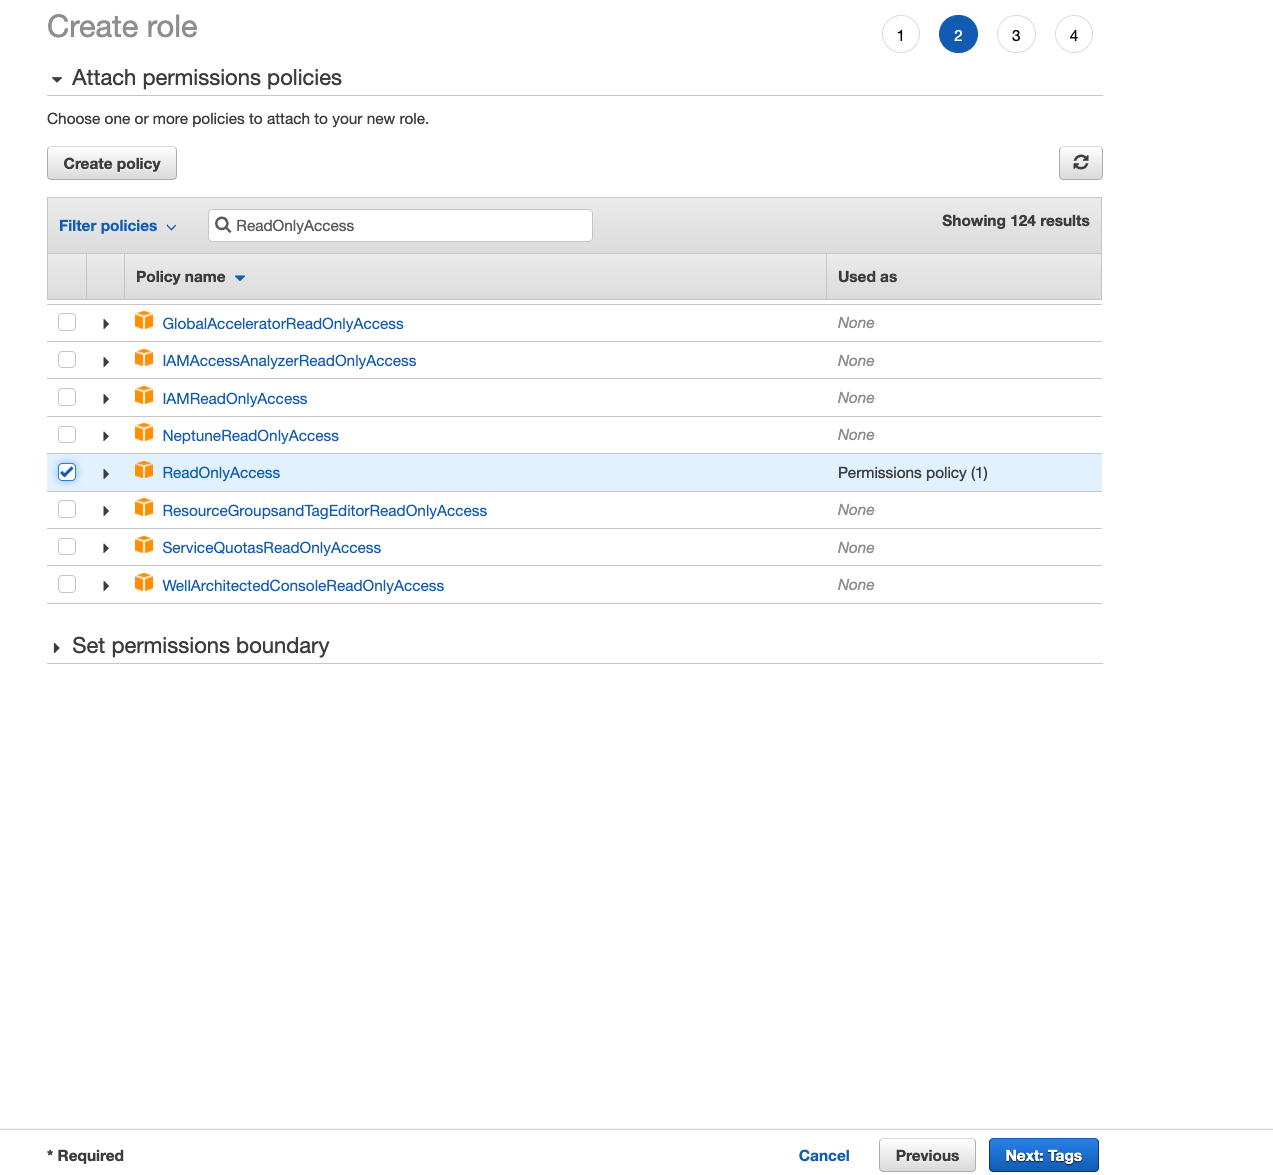
- Choose the correct set of permissions to attach to this role. The users logging into the AWS Console or via AWS CLI will assume this role and the permissions attached to this role will restrict what the users can or cannot do. For the purpose of this tutorial, we will attach AWS Managed Policy ReadOnlyAccess to this role which will allow the users read only permissions to all resources. Generally, we would attach a more restrictive policy depending on the role of the users like for a database administrator, we would allow the users to only interact with the database services in AWS which can be done by using a more restrictive IAM policy.
-
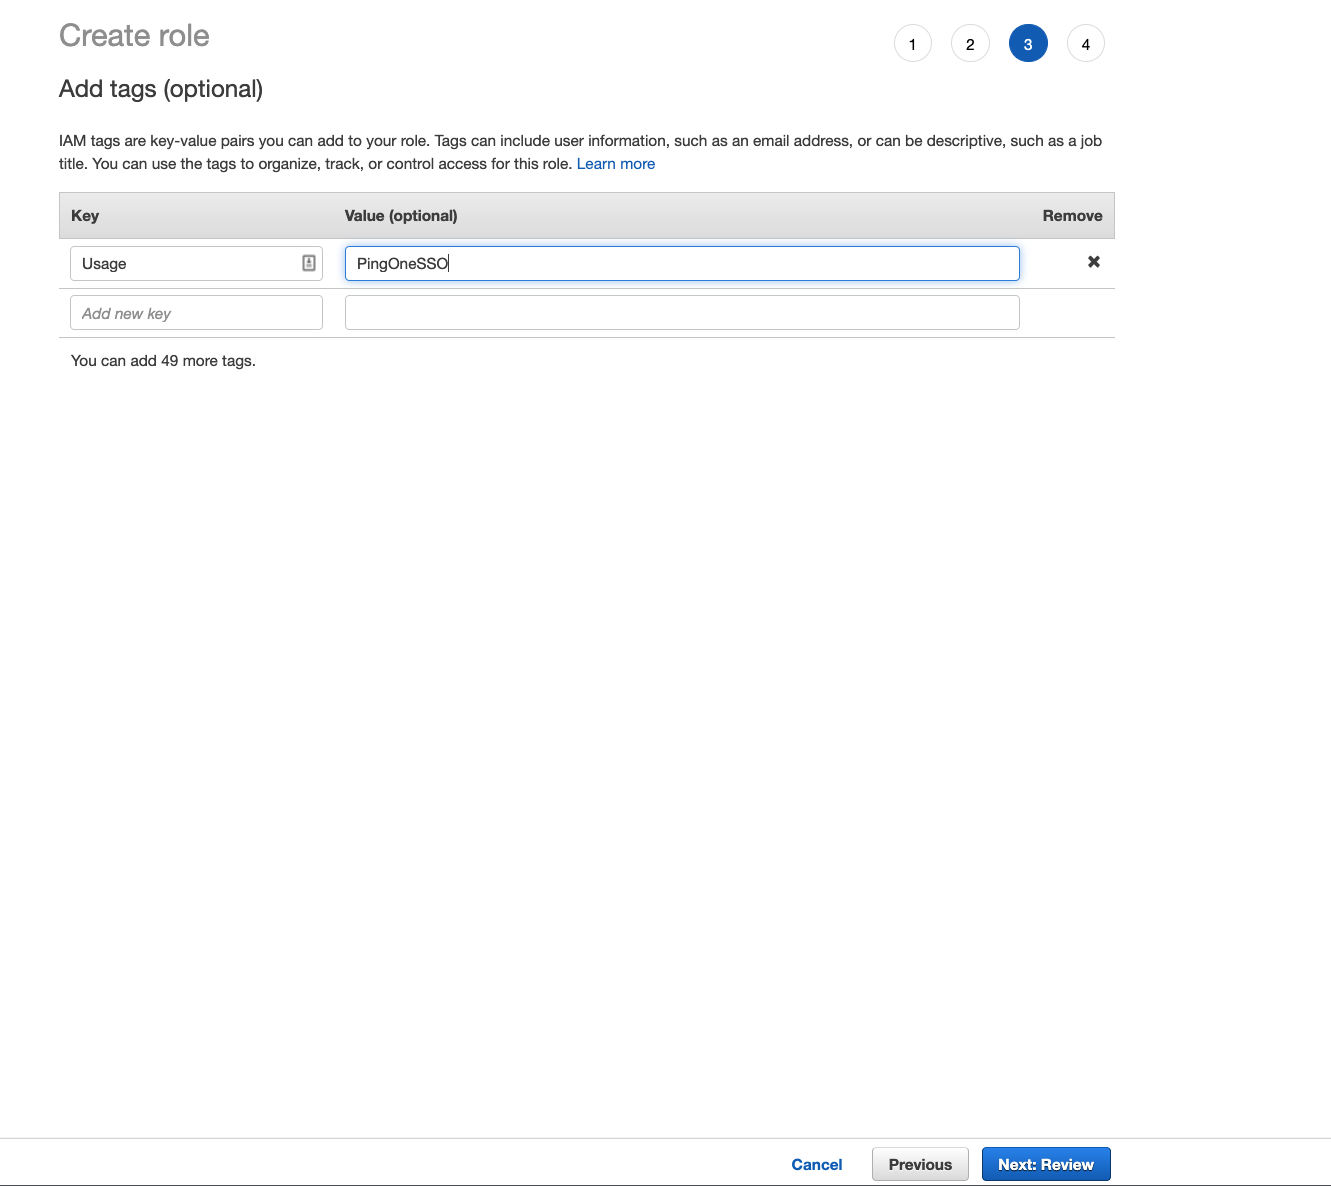
Click on Next:Tags and add appropriate tags to the IAM Role. Then click on Next:Review.
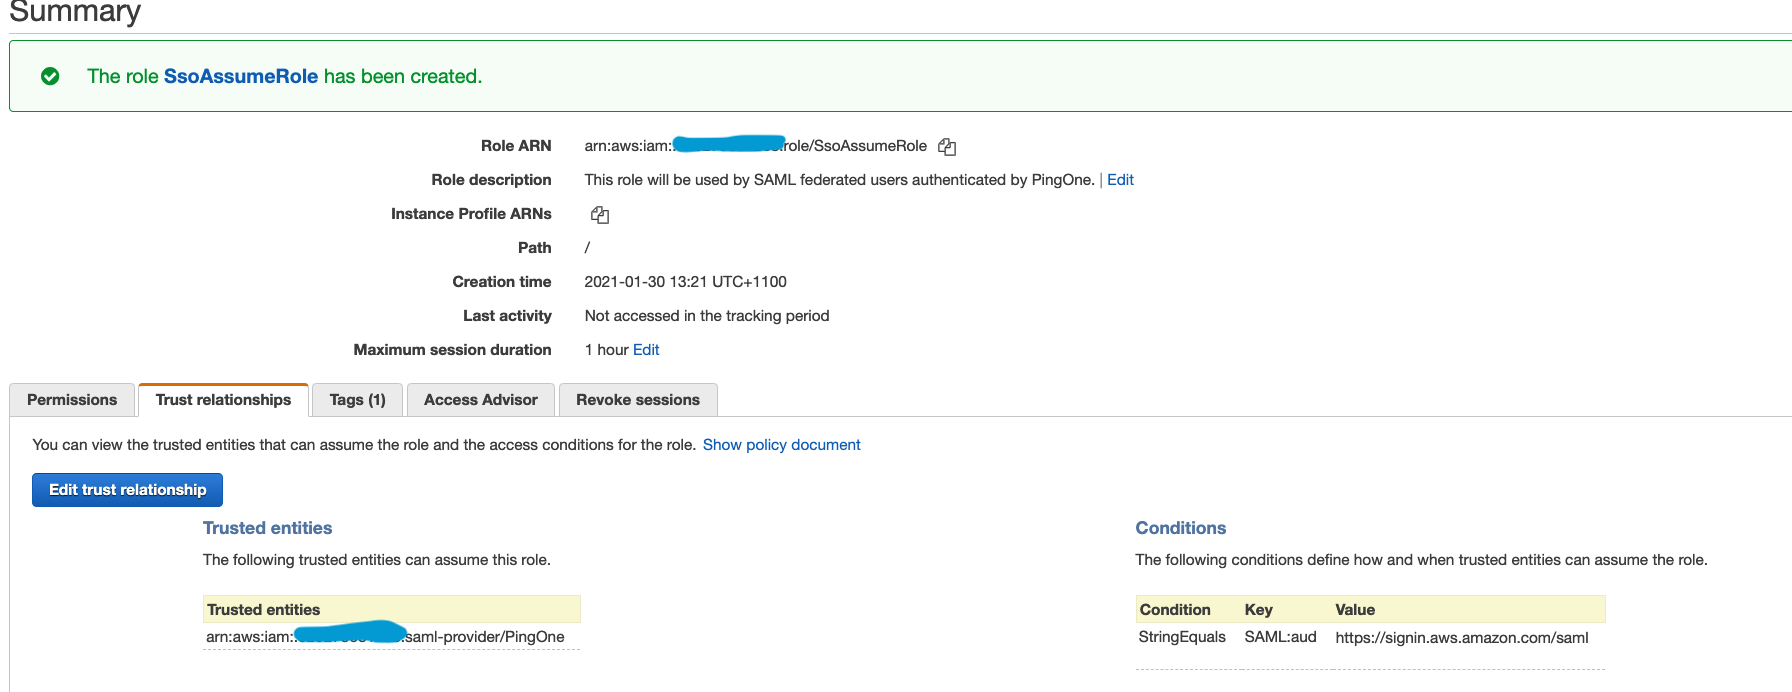
- For Role name, enter the role name we previously used in PingOne configuration to map the https://aws.amazon.com/SAML/Attributes/Role attribute. Optionally, provide a Role Description then click on Create role.
- If we take a peek into the trust relationship part of the role, we can see that only the IAM Provider that we created is allowed to assume this role. The condition explicitly ensures that the SAML audience (SAML:aud attribute) is set to the AWS sign-in endpoint for SAML (https://signin.aws.amazon.com/saml).
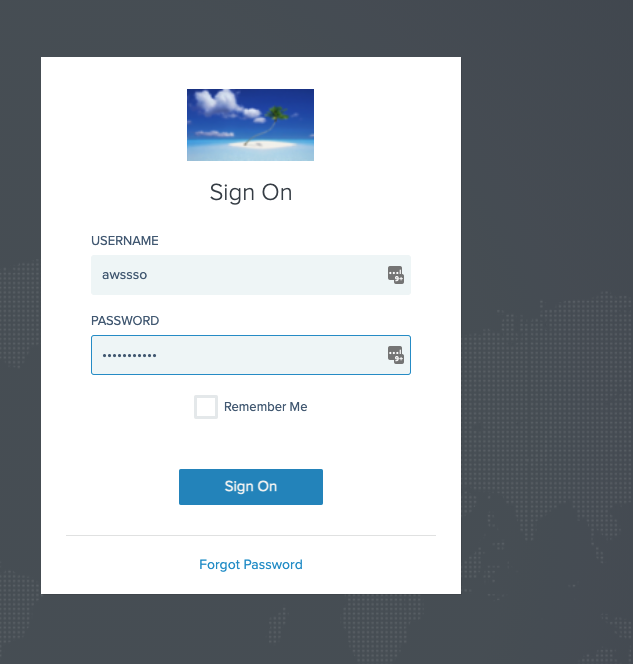
It’s now time to test if we have setup everything correctly. Navigate to the PingOne Dock using the URL copied from PingOne Admin Console earlier. Enter the username and password of the user we created when setting up PingOne. You will be asked to change the current password. When you are done, click on submit which will take you to the PingOne Dock and you will be able to see the Amazon Web Services application listed.
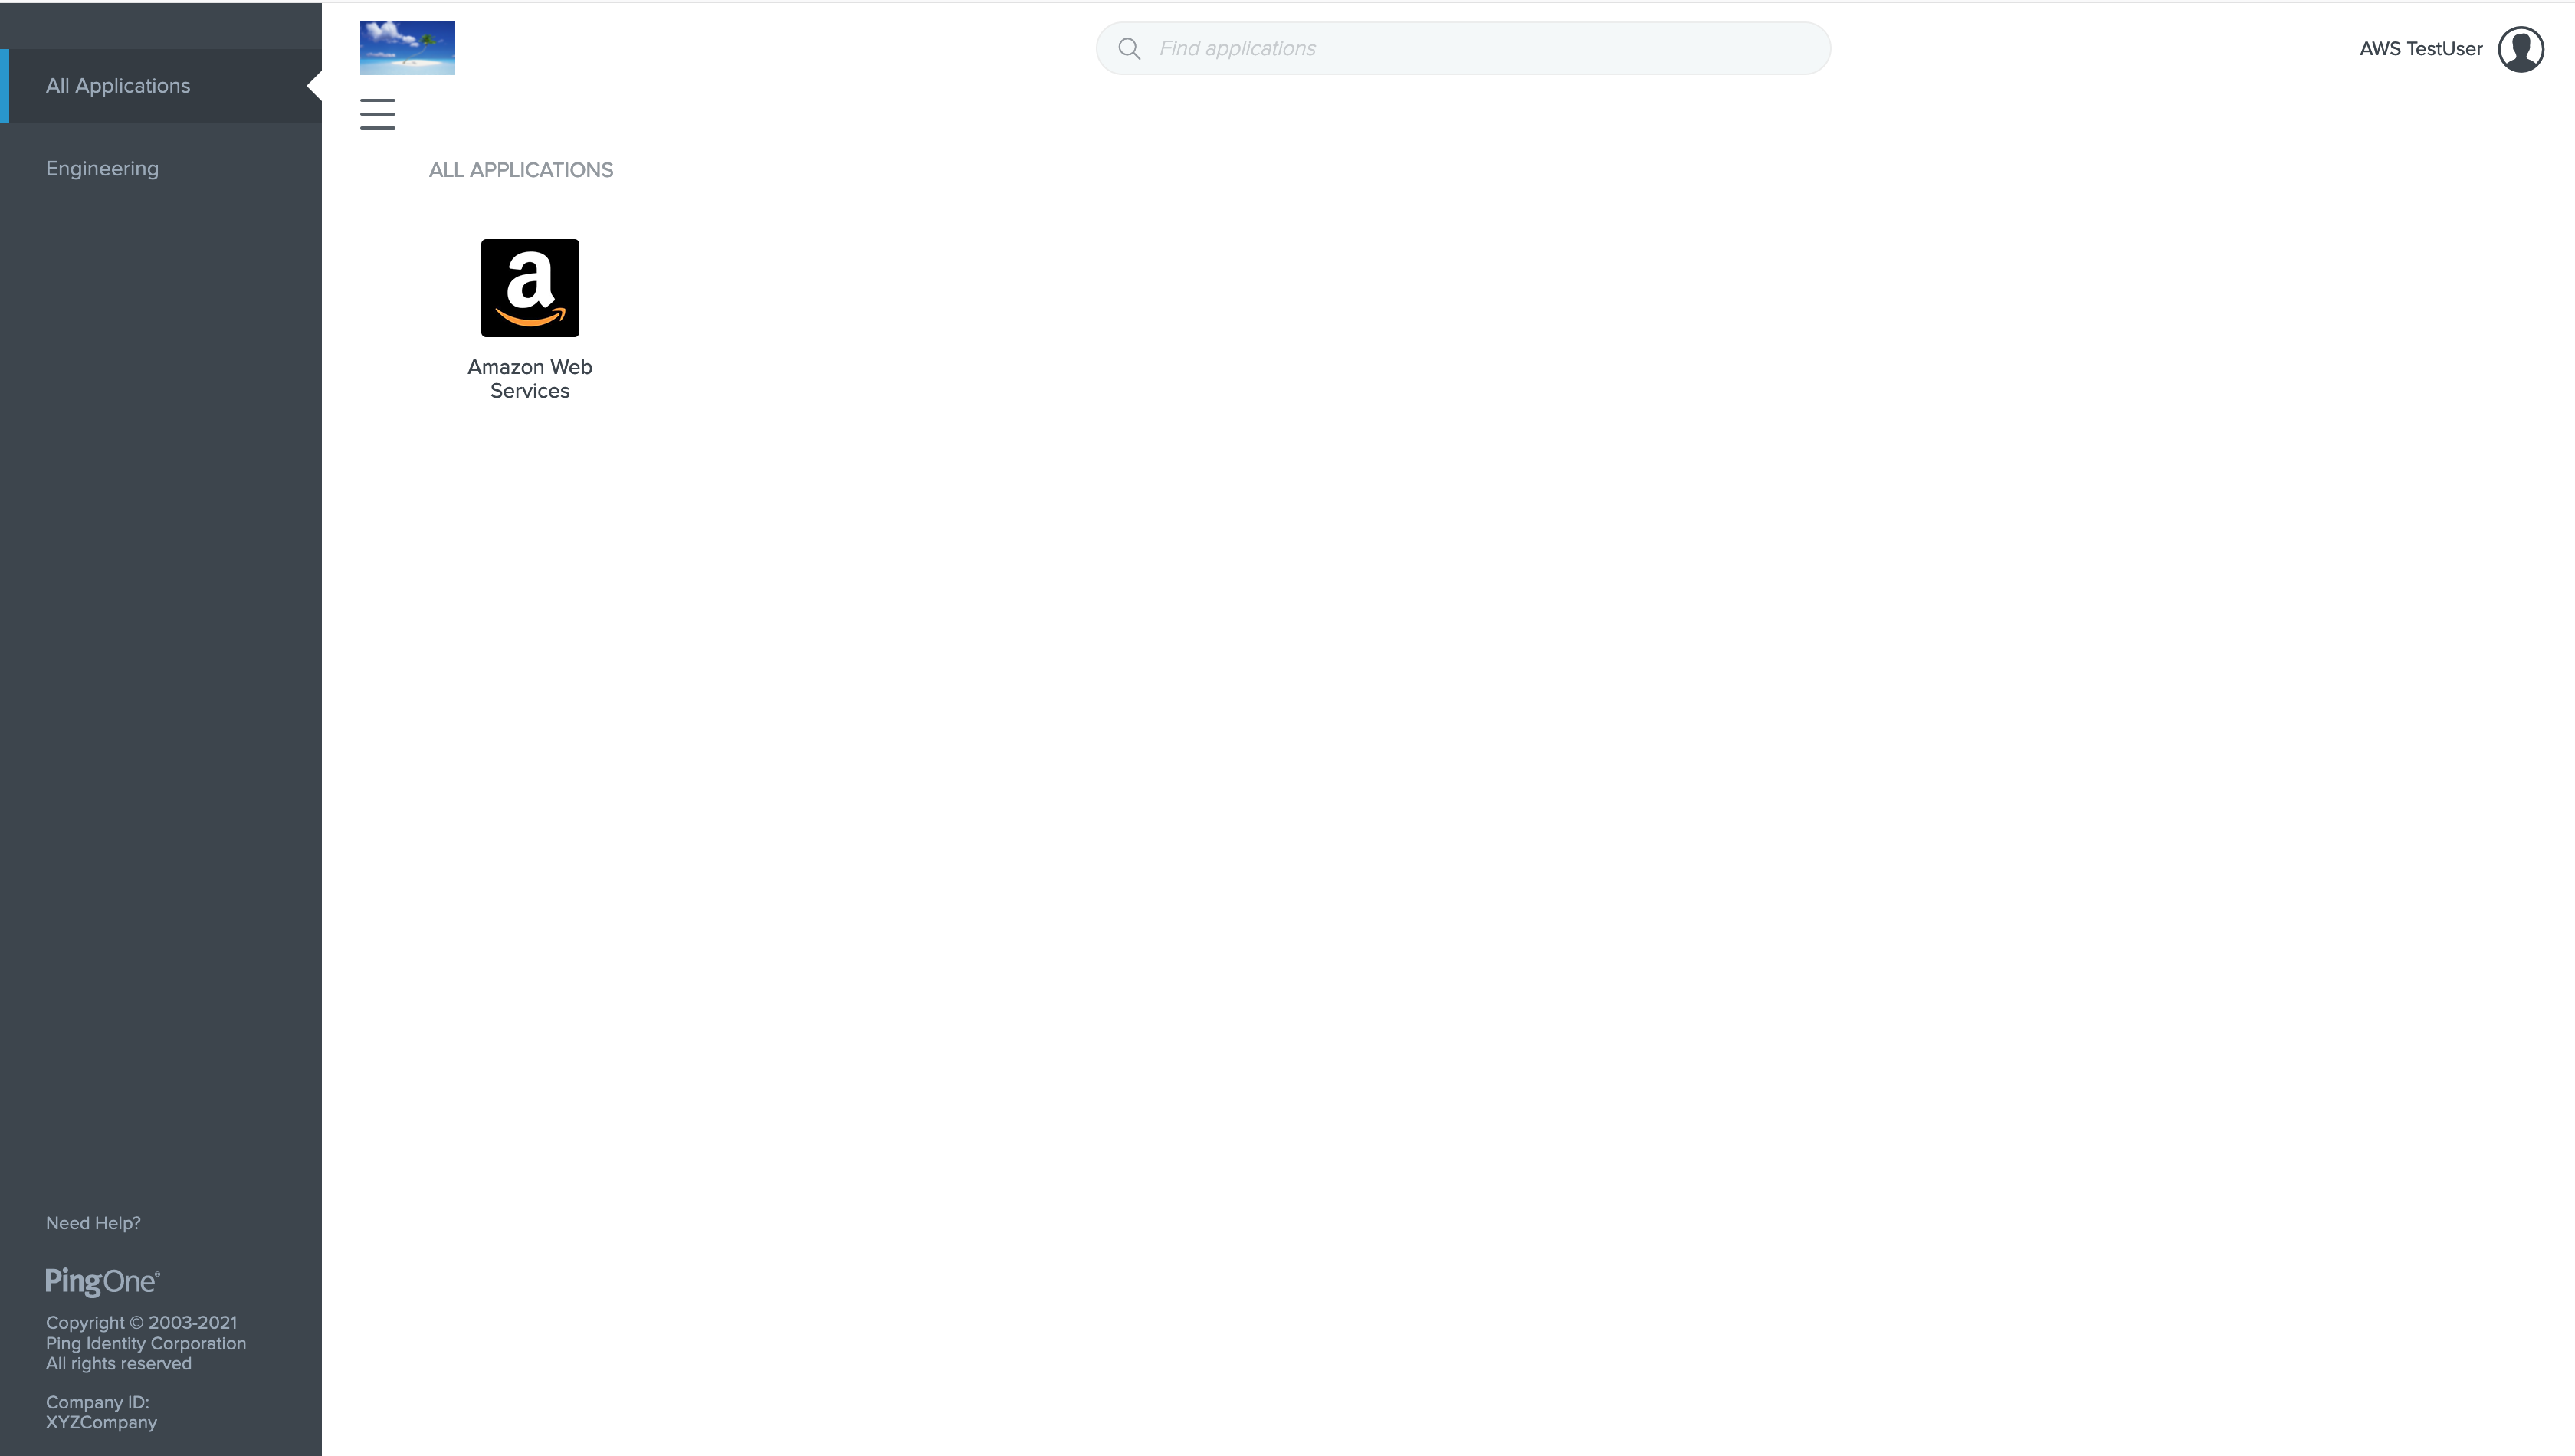
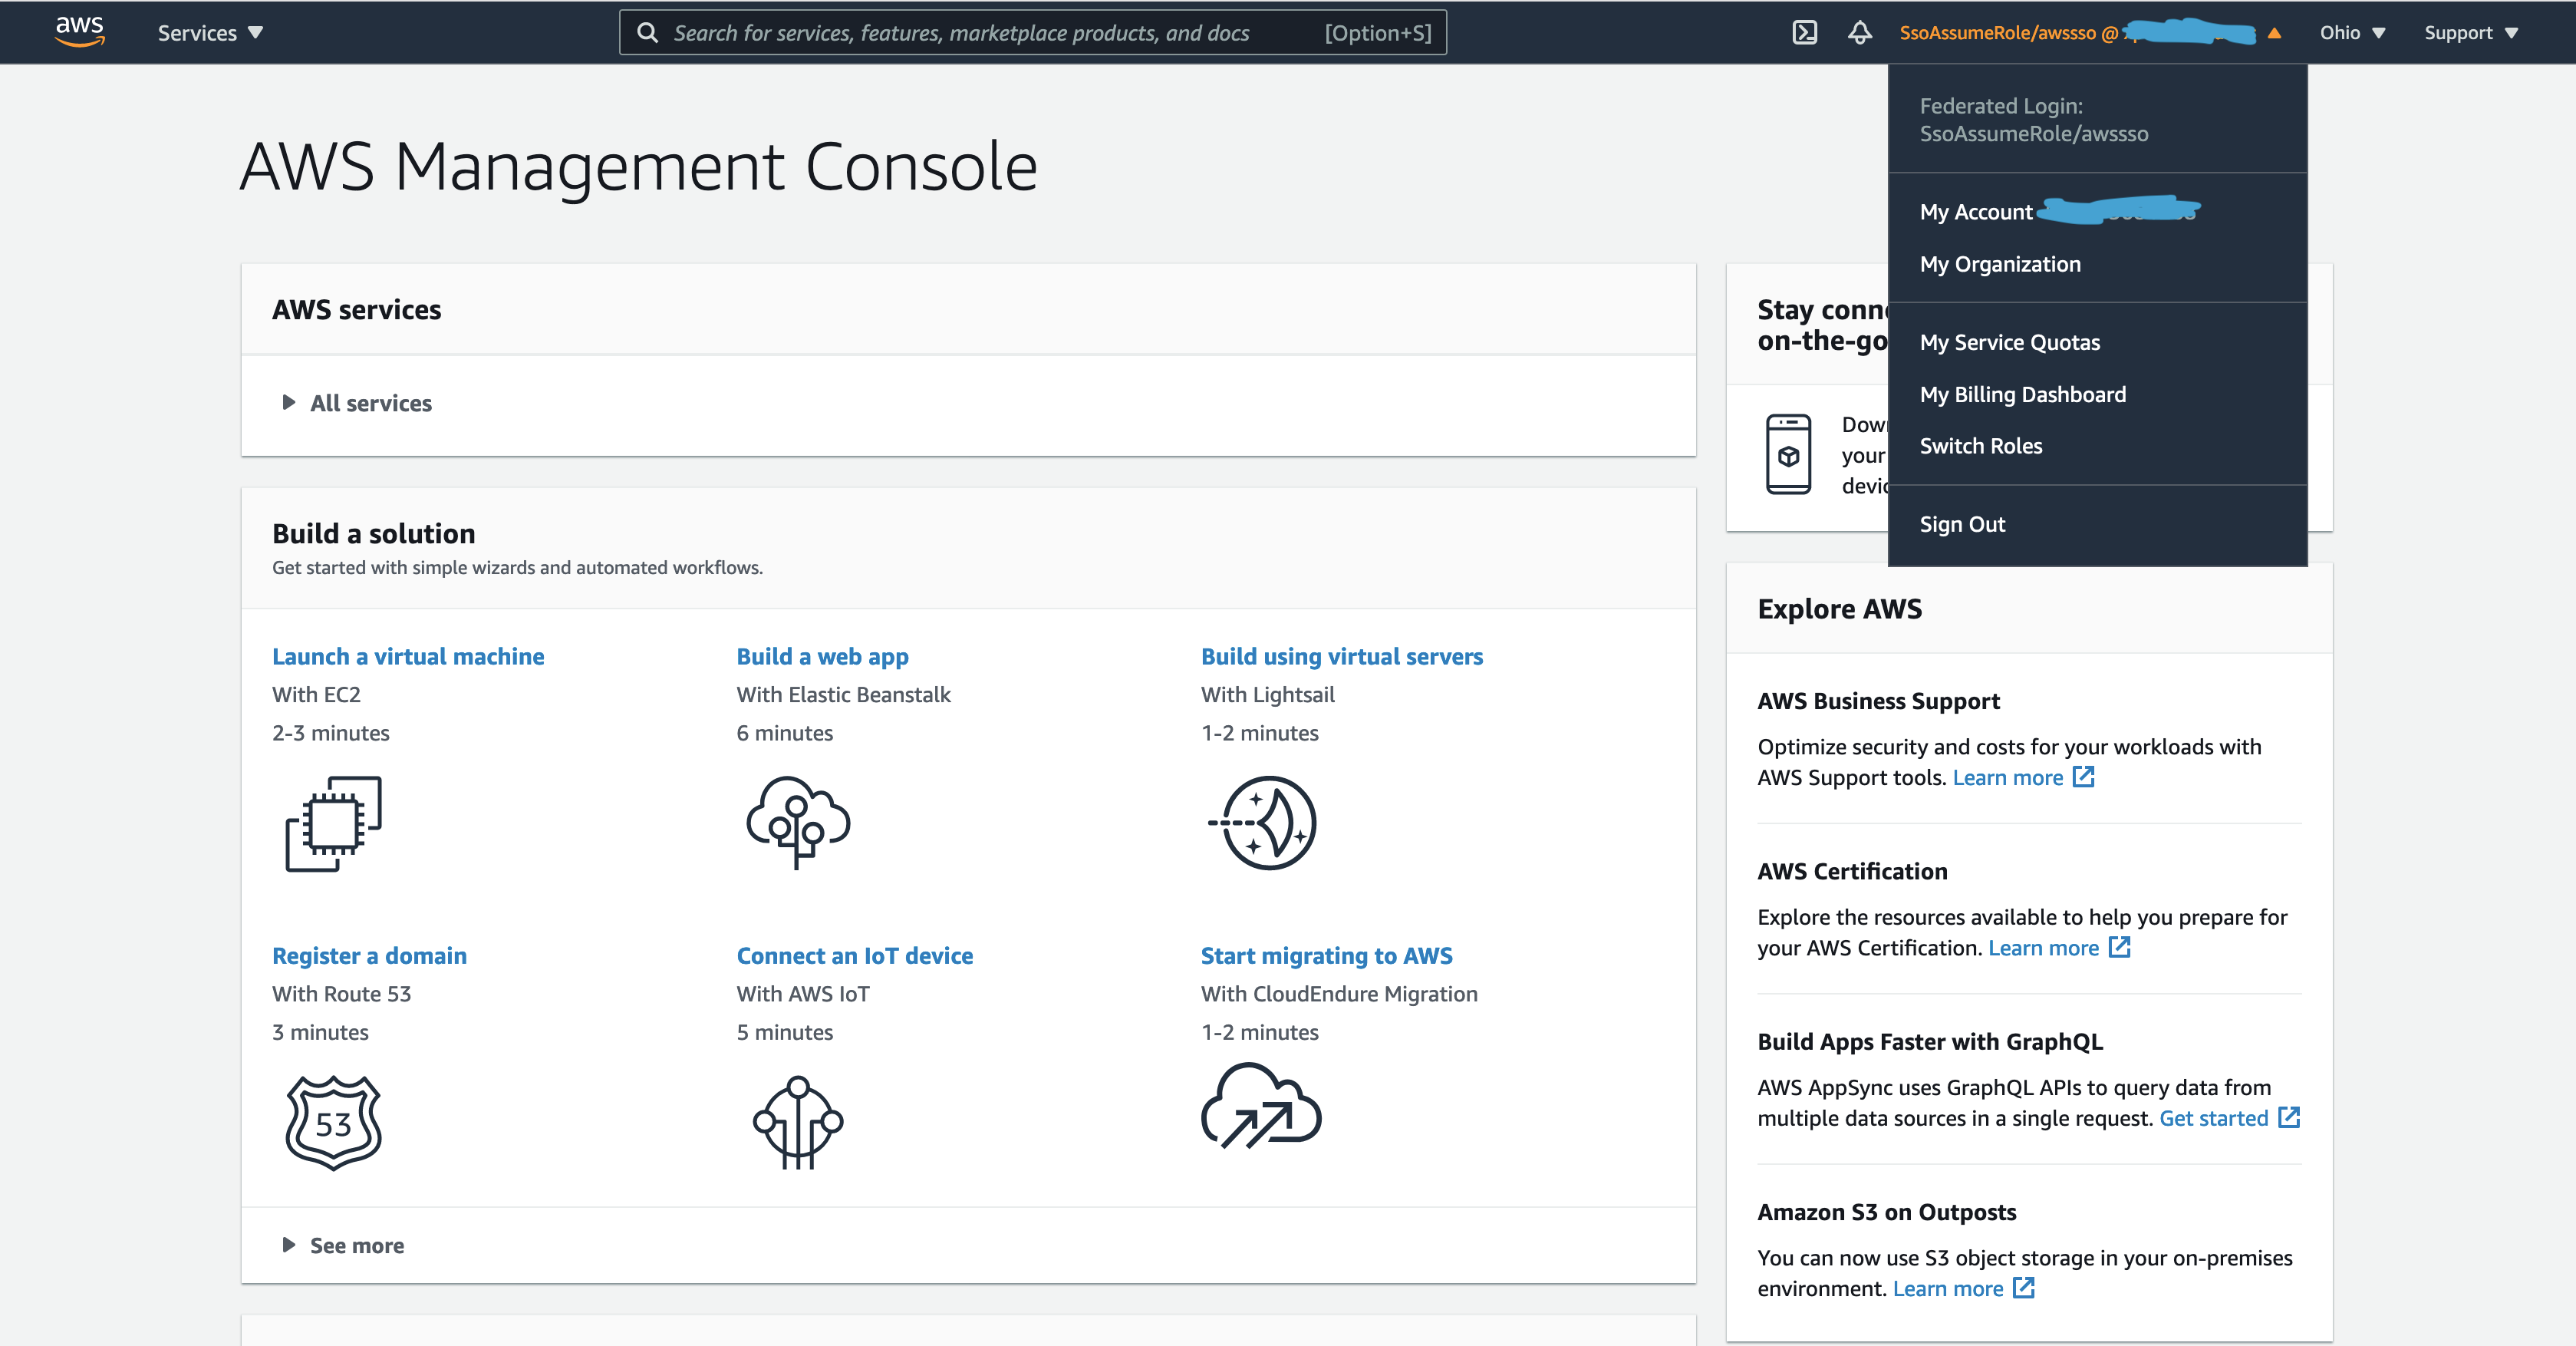
Click on the Amazon Web Services Icon which will take you to the AWS Console. Notice how the user has assumed the role we created earlier, and the username matches the user created in PingOne.
Here is the SAML assertion that was acquired from PingOne and sent to AWS,
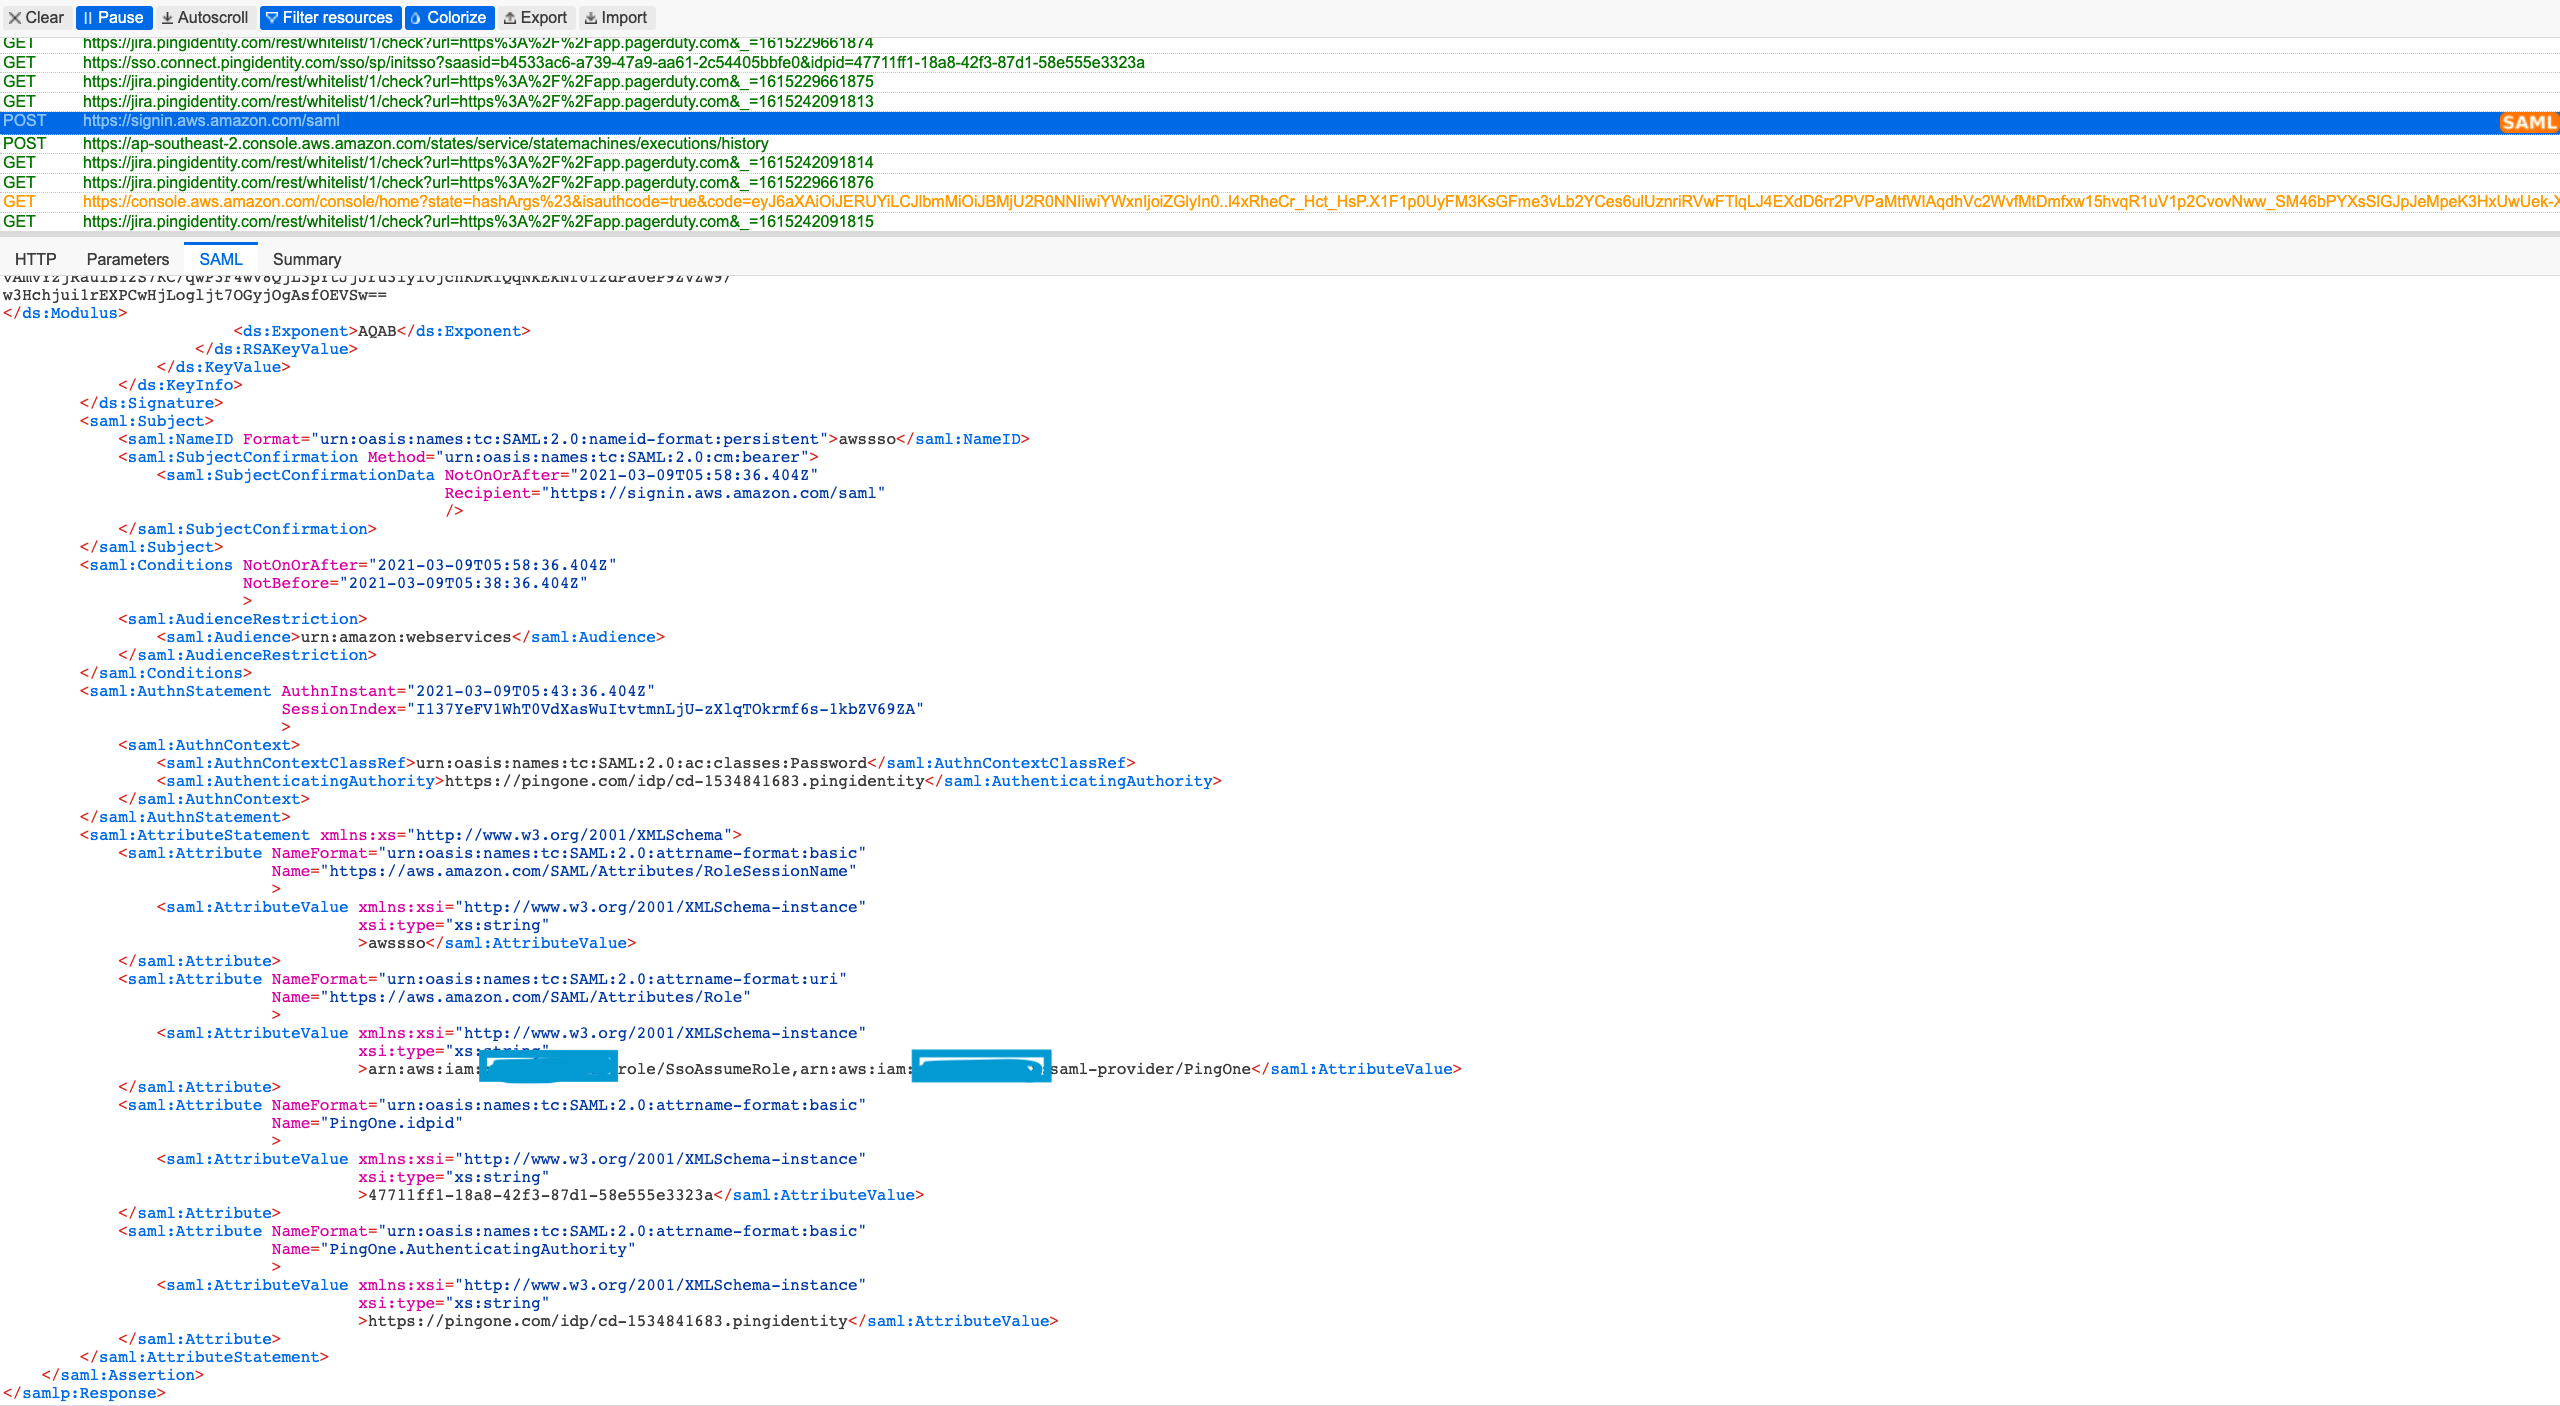
This proves that we have properly setup the configuration on both sides and we can seamlessly login to AWS leveraging PingOne as the Identity Provider. We can add more users to the group which will allow them to login to AWS as soon as they sign in to PingOne Dock and select the AWS Application.
Congratulations, you have successfully configured PingOne For Enterprise as an Identity Provider for AWS. Hopefully, this blog post has helped you get a basic idea of how SAML works and how it can be used for seamless authentication across different platforms. Now its upto you to try it out and see for yourself!


0 Comments