
Another use case for assigning a public IP address to a VM in VMware Cloud on AWS is to enable connectivity to other services or resources that are hosted outside of the VMware Cloud on the AWS environment. For example, if a company has an application or service hosted on-premises or in another public cloud, a VM in VMware Cloud on AWS with a public IP address can be used to connect to and access those resources.

In this article, we'll demonstrate how we can assign Public IP Address to workload running on VMC on AWS. In this example, we're exposing all services (including WordPress Application) running on a VM to external users.
Let's get started.
To allow internet access to workload VMs, you can request public IP addresses to be assigned to them. In VMware Cloud on AWS, the IP address will be provisioned by AWS. Ensure that your VM in VMC on AWS SDDC has been allocated a static IP address from a Private IP range from its NSX-T logical network.
To request a new Public IP address for your workload VM:
- Log in to VMware Cloud Services at https://vmc.vmware.com
- Go to Inventory > SDDCs and select an SDDC card.

Picture 1: VMware Cloud on AWS Console – Inventory Screen
- Click on "VIEW DETAILS" and then "Networking & Security" tab.
- On the Public IPs page, click "REQUEST NEW IP".

Picture 2: Network and Security Page – Public IPs screen
- Add notes about the request (e.g. linux-hybrid-app-01).

Picture 3: Network and Security Page – Public IPs - Request New IP screen
- Click "SAVE" and wait a few moments for the new public IP address to be provisioned.
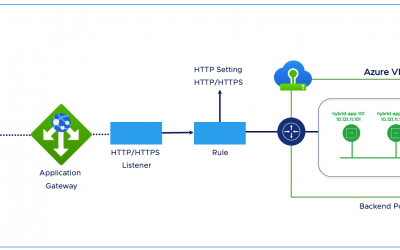
Once a public IP address is assigned to a VM in VMware Cloud on AWS, it is necessary to configure Network Address Translation (NAT) rules to direct traffic from the public IP address to the internal IP address of the VM in the Software-Defined Data Center (SDDC). To do this, follow these steps:
- In the VMware Cloud on the AWS console, navigate to the NAT section.
- Click on "Internet" to add NAT rules that will run on the default Compute Gateway.
- Click "ADD NAT RULE" and give the rule a name.
- Configure the Internet NAT rule options as needed (sample entry is shown in the figure below). This includes specifying the public IP address to be used, the internal IP address of the VM, and the ports to be used for the connection.

Picture 4: Network and Security Page – NAT - Add NAT rules screen
When configuring Network Address Translation (NAT) rules in VMware Cloud on AWS, it's important to consider the type of traffic that will be affected by the rule. As depicted in above screenshot, the following options can be configured to control the traffic that the rule applies to:
Service: Select "All Traffic" to create a rule that applies to both inbound (DNAT) and outbound (SNAT) traffic to or from the specified Internal IP. Alternatively, select one of the listed services to create an inbound (DNAT) rule that applies only to traffic using that protocol and port. Any custom services that you have created can also be selected here.
Public Port: If "All Traffic" is selected for Service, the default public port is "Any". If a particular service is selected, the rule applies to the assigned public port for that service.
Internal IP: Enter the internal IP address of the VM. This address must be on a routed SDDC network segment.
Internal Port: Displays the internal port used by the selected service. To use a custom port, you can create a custom service and then select that service in the NAT rule. If "All Traffic" is selected for Service, the default internal port is "Any". If a particular service is selected, the rule applies to the assigned internal port for that service.
Firewall: Specify how traffic subject to this NAT rule is exposed to gateway firewall rules. By default, these firewall rules match the combination of Internal IP and Internal Port. Select "Match External Address" to have firewall rules match the combination of External IP and External Port. (Distributed firewall rules never apply to external addresses or ports.)
Firewall rules and NAT rules work together, NAT rules allow traffic to reach the intended destination, and Firewall rules control the flow of traffic once it reaches the destination.
Once complete, if we browse the Public IP 35.83.166.176, we'll be able to see the WordPress Site being served from the workload VM (with Internal IP address 10.123.12.3) running on VMware Cloud on AWS SDDC.

Picture 5: vCenter Web console showing the Internal IP Address (10.123.12.3) of VM hosting WordPress

Picture 6: Browser screen accessing Public IP address 35.83.166.176 that fetches WordPress site from VM in VMware Cloud on AWS
Releasing Unused IP:

Picture 7: Network and Security Page – Public IPs – Release IP page
- Click on CONFIRM to Release IP.

Picture 8: Network and Security Page – Public IPs – Successful Public IP Release notification
And that's it.
In conclusion, assigning a public IP address to a VM in VMware Cloud on AWS can provide several benefits, including increased accessibility, improved connectivity with external resources, and enhanced security. While there are many ways to provide public access to VMs, in this article we covered a simple use case when a Public IP address is directly assigned to a workload VM running in VMware Cloud on AWS.
Satya is an experienced IT professional with a demonstrated history of working in the Information Technology with years of experience in multiple industry verticals. He currently works for VMware as Staff Cloud Solutions Architect. He is skilled in designing and implementing Enterprise Application Suite in Public, Private and Hybrid cloud infrastructure including AWS, VMware, VMware Cloud on AWS, Microsoft Azure, Google Cloud and the like.
Get connected with Satya:


0 Comments